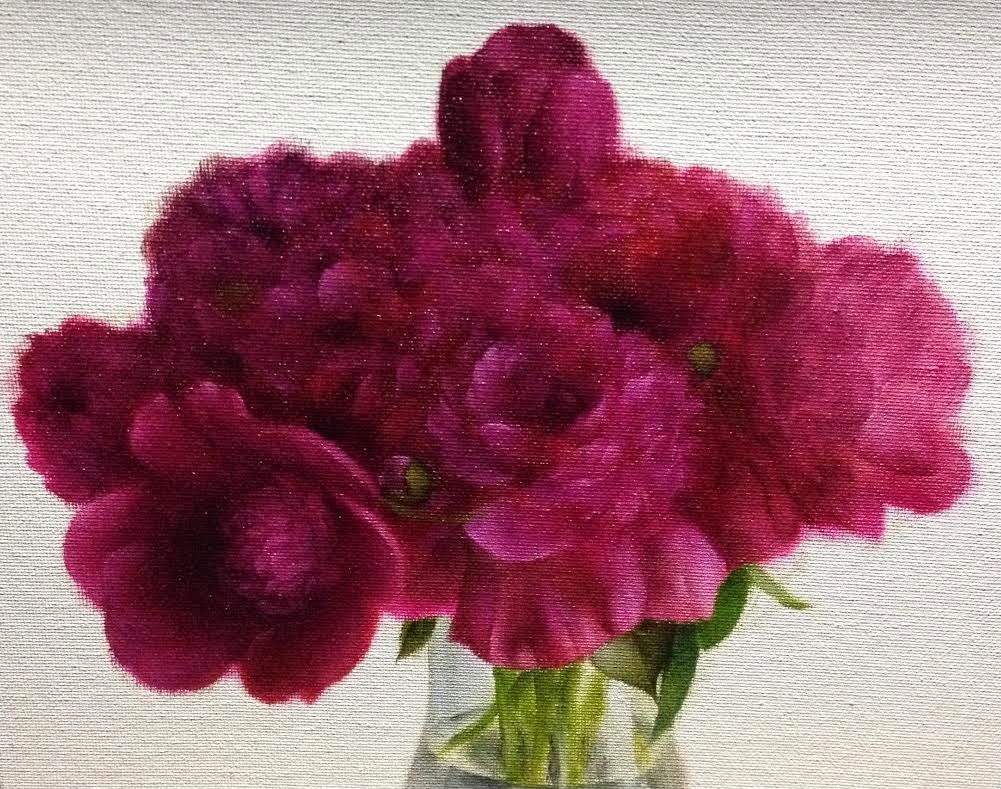
Showing posts with label still life painting. Show all posts

Monday, December 1, 2014

Fuchsia Peonies

Sold
"Fuchsia Peonies"
8 x 10 in
Oil on Canvas Panel

I am well aware Peonies are out of season, These peonies I bought for my wife a while ago and loved how they looked. I took a picture and always said "I will paint that one day" well that day finally came.  The texture and movement within these flowers are spectacular, I tried so hard to portray that in my painting. Fuchsia Peonies are always fun to paint due to the purples, blues and reds that are hidden within each pedal. The movement from one petal to the other has a beautiful gestural quality to it. It is a challenging flower to paint but always rewarding in the end.

Thanks for stopping by, cheers!

Thursday, October 23, 2014

Still LIfe Paintings on my Etsy Store

"Cheese Board"
16 x 20 in
Oil on Canvas

"Evening Tea"
14 x 18 in
Oil on Linen

I have created a section to sell my still life paintings at my Etsy store. The prices are a little different than my alla prima paintings, of course these take more time to complete with many levels of paint. 

Enjoy!


Saturday, June 21, 2014

"Cheese Board"

"Cheese Board"
16 x 20 in
Oil on Canvas 

This is a new still life painting I made for an Art Fair I participated a couple weeks ago. I will post more pictures soon of the whole event and the other paintings I showed there. It was nice painting a still life again in the classical method. Setting up the objects and painting them fast enough before they start rotting was a challenge. 

The setup.

Process pics of the grapes and cheese near completion.

The bread also near completion. 

Once the foreground was complete I filled in the background and brought the whole painting together. I was able to soften edges and make objects recede. I was using Ivory Black and knew that it's a slow drier, which is the reason I saved it till the last stage. Once the black was painted in, I then went back to the foreground and keyed up certain values and hues.

Once the painting was complete I was able to enjoy the still life by drinking some good wine with grapes, bread and cheese. Thank you for stopping by and viewing! 


Monday, October 29, 2012

"Roses"

Sold
"Roses"
9 x 12 in
Oil on Canvas Panel

The weather is definitely getting cooler as October draws to an end.  Halloween is right around the corner and day light seems to be leaving quicker.  With this painting I wanted to capture the feel of colors that seem to be transitioning from fall to winter.  White roses are beautiful in any color setting, it can get tricky due to its nature of absorbing it's surrounding colors.  With any subject you paint it radiates its surrounding colors, its even more with white roses in comparison to a regular object.  Learning to control its hues and temperature is key in order to make white roses believable.  You can argue that is true with any object your paint, with right roses one has to be even more careful with these observations.  

I hope you enjoyed this painting, thank you for stopping by.     

Sunday, October 14, 2012

Apple Cider

Sold
"Apple Cider"
8 x 10 in
Oil on Canvas Panel

I have a confession, I really do miss creating these daily paintings!  I know I have stated that I will not paint them anymore due to the new direction I want to go with my body of work, but they are great practice.  I wanted to miss them which will hopefully force me to do more, but for now I feel I got my fix.  

I wanted to create a small painting to rein in the change of season.  Here in Minneapolis the leaves are changing and the weather is becoming cooler.  Other than hot chocolate I really enjoy drinking apple cider when the weather starts to become cooler.  Being raised in Florida we are only used to one season, summer, but here in Minneapolis I have come to enjoy and appreciate the change of seasons.  All the people here really take advantage of each season, it can be below zero and they'll find something to do.  I have never had apple cider until moving here and I am addicted.  I can easily have a gallon in one night and not think twice about it.  We went to an apple orchard the weekend before and got the idea to create this painting.  My fiancee puts an orange in the pot when the cider is cooking, doing this gives a nice taste to the cider when its done.  I hope with this small painting it can give you the warmth and excitement that I feel for fall.

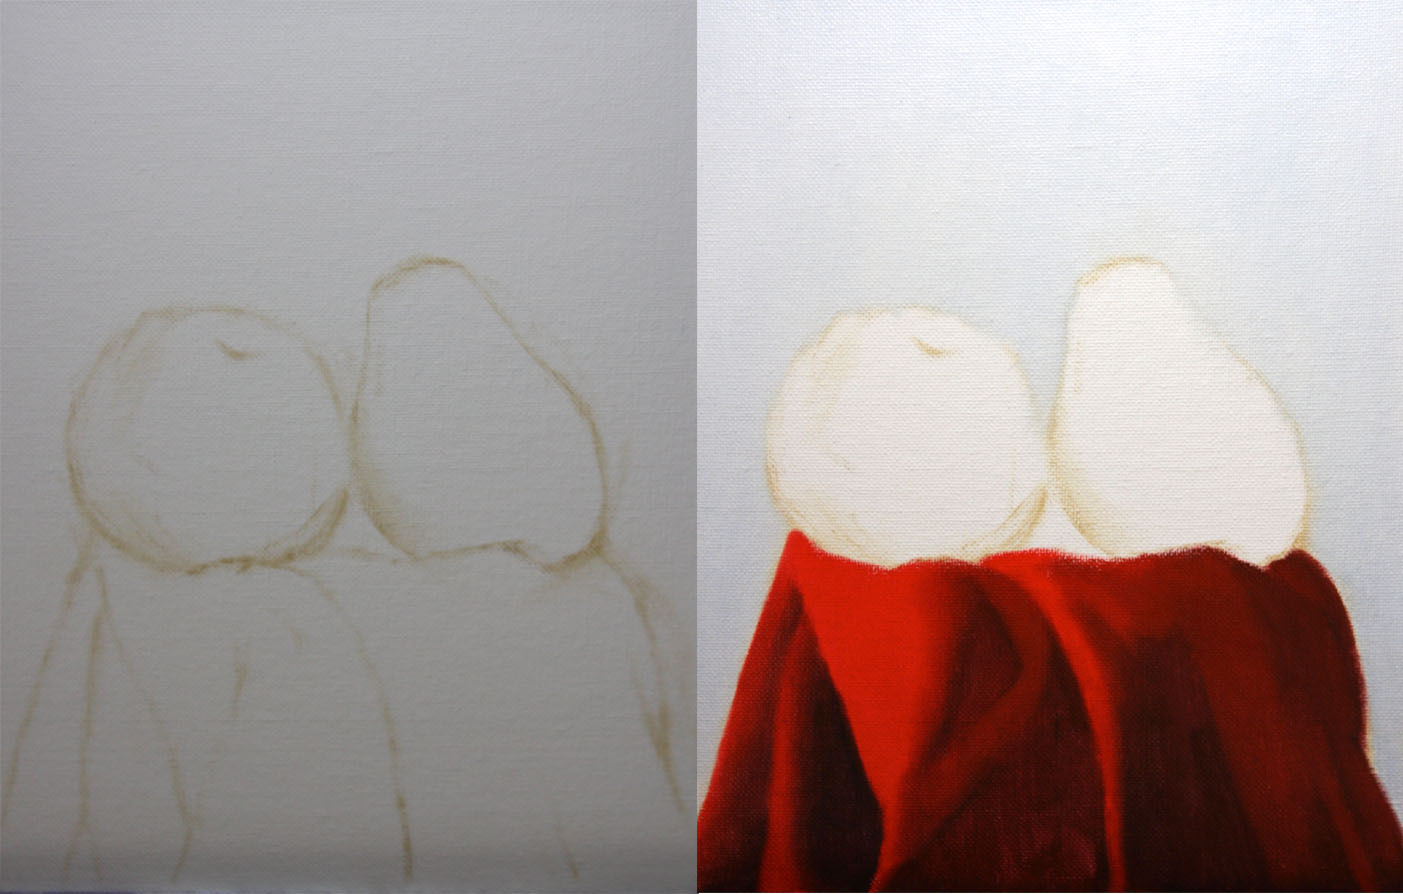
I also miss doing a step by step demo, glad to finally get back and show how I create these little guys.  I start with a light drawing of raw umber of the compositional setup that I am going for.  I like to keep this stage fairly light with the lines, it'll be easier to paint over once I get thicker paint onto the canvas.  Keeping the lines light also makes it easier to erase.  As you can see in the first picture with the drawing I shifted the composition to the left, if the lines were darker it would of been difficult to make that easy change.  Once the composition is complete I start with one section of the painting to give it my full attention.  I know some people like to work through the whole painting all at once, for me I find it easier to work with one section at a time and move on to the next.  It's really depends on your own work ethic.  I like to work this way but I also keep in mind when the painting is almost complete I look at the overall picture and make subtle changes.  When working in one section at a time the colors do change when you add a different element to a different section or a different value.  That's why in the end of the painting I like to go around the painting and just push thing's here and there to make the painting look like it was painted all at once.  I start with the orange by just adding the middle values and not adding the high and low keys.  At this stage I am thinking of making the form turn, not so much about the details but more about the form.  

Once the form is turning I start with the middle to darker forms, I start dabbing them where they need to be placed at.  While dabbing them in there areas I am conscious of the big form modeling I painted in the beginning stage, alway's keeping in mind that the little shapes I am painting has to work with the overall form.  In this stage I am also keeping the paints fairly thin not going to thick.  Once that middle to darker forms are complete I move onto the middle to lighter shapes.  When working in the lighter shapes I go thicker with the paints, this gives the texture I am going for and allows me to sculpt the paint.  Remember as well once you put more information down some areas will change in value and chroma, expect that and just go into that section and adjust it accordingly so.  Once the lighter forms and highlights are complete I move on to the apple.  With the apple it gets a little trickier when working with big form modeling due tot he colors all in one area.  You have to simplify the beginning stage and not get carried away with their details.  I then start to add the middle to darker values.

Then I start to add the lighter values and tie in the whole apple together.  Once the apple is close to completion I move onto the cinnamon sticks.  With the cinnamon sticks I approached it a bit different by just putting in all the information all at once rather than doing big form modeling and moving in from there.  I do like painting this way as well, I would recommend doing this once you understand how light wraps around the form and how light effects the form as well.  Painting in this manner can get really muddy quicker than you would expect it to, that's why its tricky painting this way.  In this stage I laid down all the colors and values, then I started to sculpt them where they needed to be.  It gives it a nice sculptural look that I do enjoy, I'll keep playing around with this approach.  I didn't take the cinnamon sticks to a complete finish because I needed the wooden base to be filled in since the overall value of the base effects the chroma and value of the cinnamon sticks.

I laid down a thin application of the base colors, then I was able to complete the cinnamon sticks.  Once the cinnamon sticks where complete I was able to go in the darker sections of the wooden base.  Adding the smaller darker shapes to the base brought it closer to a finish.  

After adding the lighter shapes to the base doing this changes the surround chroma and values.  I shift things here and there to make it look like a whole.  Then I move onto the background and this really brings the painting together, I am able to add any finishing details that pull everything together.  That's one of the reason's I like to take each section to a close finish, this allows me to tie everything together in the end.

My partner in crime when I paint, well he tries to be, it's hard to hold him when I'm standing and painting.    

I hope you enjoyed this demo and appreciate you stopping by.  Cheers!


Wednesday, April 18, 2012

"Green Vase"

Sold
"Green Vase"
6 x 6 in 
Oil on Canvas Panel
Today I saw this vase around the house and saw how much I liked the way it looks on these wooden panels.  There's no particular explanation why I chose to paint this just the sole purpose of getting inspired by what I saw at that moment.  It's great being able to pick up the brush and just paint what you see, I was not planning to paint today but I did see this vase and how the light was hitting it and just had to.  There's beauty in everything we see I know it sounds cheesy but its very true, it can be the most mundane thing and it still has some beauty to it.  It just matters how one perceives what he or she is looking at.  
I started with the usual dry brush approach of using just a bit of raw umber on the brush for the drawing stage.  After the drawing stage I stated the local color in the vase by using viridian, cadmium yellow and raw umber.  When stating the general colors I am also stating the big form modeling, i'm not stating the extreme values of the darkest and lightest values just a close approximation to get a base down.  The extreme shifts of values I leave towards the end of smaller form modeling.
Then I start stating the middle to darker value within the vase, this is where I start stating the darkest values to get the point across that the form is turning.  Then I state the lighter values with their specific forms, this stage I also state the highest value or highlight to tie it together. 
After the vase is done I moved on to the background and stated the base and background together.  I used ultramarine blue, raw umber, naples yellow and titanium white for both.  I hope you enjoyed this simple and quick painting, thanks for stopping by and viewing.


Tuesday, February 7, 2012

"Lemon Plums"

"Lemon Plums"
6 x 6 in
Oil on Canvas Panel
These lemon plums caught my eye in the grocery store I could not get my eyes off of them.  They are unique looking to say the least and you know automatically I have to paint it.  I really like their colors and how orange their tips are.  Along with the colors I enjoy their textures, they are subtle but painting the smooth to rougher texture in one plane was a nice challenge.
I wanted to remind everyone that I am doing a painting demo this Thursday at Dick Blick in Edina, Minnesota from 10:45 to 2:00pm.  I hope to see you guys there! 
I started with the usual dry brush approach for the drawing stage.  Once the drawing is complete I stated the big form modeling with a very thin mixture on the brush, its a dry brush approach as well.  
I then just concentrate on the darker values with their specific forms.  Once thats completed I move onto the lighter forms and continue the same process.
I repeat the same process on the second lemon plum till its completed.    
Once the plums are complete I state the wooden base by applying a thin coat for the base.  Going back to the plums you can see that I start really thin with my mixture, this allows me to control my values from the brush touching the canvas.  Think of it as rendering with a pencil, once you put the pencil to the paper to get the subtle rendering you need to have a soft touch, same idea.  When I need the colors or values to be stronger and more opaque I'll go thicker with the paints, but I do so in a slow manner making sure the transitions are working within each other.  
Then I paint in the darker values with their specific forms and do the same with the lighter values.  
Once the wooden base is complete I start on the background, in this stage I make sure to take my time in polishing all the edges.  Thanks for stopping and viewing, hope you enjoyed!


Monday, January 30, 2012

"Blood Oranges"

Sold
"Blood Oranges"
6 x 8 in 
Oil on Canvas Panel
I have not painted blood oranges in a while and wanted to challenge myself by painting there subtle and hard textures.  I also was looking forward into painting the reds within the oranges, I think those two combination work well together.  My approach to this painting is different than what I've been doing lately, it's more of the way I painted when I first started doing these alla prima's.  It was nice to change it up and go back to my old approach, I still think it's great to paint in this way it allows you to concentrate in one section and take it to a finish before moving onto the next.  It's easy to just jump around and work on other areas which will just keep you going in circles, this approach allows you to just paint a certain section and not move until its complete.  Time to keep experimenting with my old and new technique, see what I can get from the two once their meshed together.  
I started with the usual dry brush approach using no mediums and a bit of raw umber on the brush.  Once the drawing was complete I stated the background my using ultramarine blue and titanium white.
Then I started by concentrating on one section at a time, normally I would do big form modeling at this stage.  I forced myself not to move from this section until it was completely done.  I started with a thin application of the areas that I was laying in first, slowly I build the thickness and opacity I'm looking for. Once the shadows are complete I move onto the middle to lighter values of the orange.  I'm being sensitive to the brush strokes and edges they create, I want to keep the transitions smooth and not get to thick in the beginning.  The colors I used in this section were cad.orange, naphthol red, cad.red, raw umber, and cad.yellow pale hue.
I then added the highlights to the orange and took it to a complete finish.  When adding the highlights or layers on top of the beginning layers you have to be soft to the touch, try not to pick up the paint that's already laid down, think of it as a build up of layers that's creating a three dimensional illusion.  The softer you apply pressure to the brush the more blend it will create and you also get better brush control.  Once the first orange is complete I move onto the second one, repeating the same process as I did with the first.
Once the second one is complete I move onto the darkest part of the base, I only concentrate in this section and take it to a finish before moving onto the next.  The colors I used were ivory black, raw umber, titanium white, ultramarine blue, and cad.orange.  
I then added the top of the base with its highlights as well, the colors I used in this section were ivory black, raw umber, titanium white and ultramarine blue.  When adding the lighter sections and even the cast shadows I had to be careful with the silhouette of the oranges.  Certain sections you have to just slow down and take your time, this section was definitely one of those instances.  This approach is more time consuming and really forces you to slow down with each section, its great in order to get into that painting mind set.  As mentioned in the opening paragraph i'm looking forward to see how I can mesh this approach with my current one, I'll definitely keep you posted.  Thanks for stopping by and viewing, hope you enjoyed this one.


Monday, January 23, 2012

"Rosas Bianco"

"Rosas Bianco"
9 x 12 in
Oil on Canvas Panel
Over the weekend I did a study of a Norman Rockwell painting and learned so much from it.  I love doing copies because I always get something out of it.  Norman Rockwell is one of my idols, I love the way he paints texture on every subject he paints.  I also love the way he depicts stories in his paintings, he is known for being an illustrator to me though he is a fine artist as well as an illustrator.  I recommend to any painter out there that wants to keep learning and improving on their skills to copy a painting they really admire, you will gain so much out of it from the color choices to the brush strokes they used.  When I started painting this one today I thought it would of been a walk in the park, well I was in for a rude awakening.  White roses are extremely hard to paint due to their subtle colors, if you don't control the value and colors it can get really bad quickly.  I cannot tell you how many times I was just going to stop with this painting, especially after doing the copy I thought I was just going to easily get this one done.  Once I completely started to concentrate on the light and how to render its textures on the leaves and roses the painting started to come along.  When I was painting the leaves that's where I saw the light in the end of the tunnel, I started to remember what I learned from the Rockwell study and put those two together.  I'm glad I stuck it through I learned so much and really happy with the results.  I hope you guys enjoyed this one, thanks for stopping by and viewing.
Norman Rockwell copy.

Thursday, January 5, 2012

"Evening Tea"

"Evening Tea"
14 x 18 in
Oil on Linen
This is my latest still life painting (not an alla prima painting), its of oranges surrounding this beautiful rustic tea kettle resting on a geisha blue cloth and a wooden stool peaking through.  To say I had fun painting this one would be a complete understatement, I wanted to control and manipulate a bit the lighting pattern in my painting.  One thing is to copy from life the other is enhancing what you'r painting and make it your own.  I had this gold frame for a while and glad I was finally able to create a painting worth of it.
I started with getting the setup just right and positioning my canvas to a close sight to size copy I can get to.
I did the drawing in raw umber, concentrated in simplifying the shapes as much as I can and positioning them just right.
Then did a whole underpainting in raw umber, and cremnitz white.  This allows me to get the tone I'm going for and play with the lights a bit.  I usually don't do this when starting a painting but wanted to try something different this time.  This is also good to do if you haven't prepared your canvas with a ground, it gives the linen some tooth.
I started to paint the blue cloth and oranges, as you can see I had to get other oranges because they started to go bad and change colors.  There are many tricks you have to improvise when painting from life especially with still life's pertaining to fruits and vegetables.  This is the last picture I took of the process and apologize for not taking more.  Basically I worked on each section to a finish and brought the whole painting to a finish by repeating this process.  The process I use for my alla prima's I applied to  this painting, I saw how easier it was to achieve difficult transitions in certain areas and have a unity throughout the finish of the painting.    

Just a reminder to everyone you can sign up for my new lesson on how to paint "Pink Roses".  Here's a trailer for it:


Tuesday, December 6, 2011

"Forelle Pears 2"

Sold
"Forelle Pears 2"
10 x 8 in 
Oil on Canvas Panel

After a well rested weekend with friends, I'm ready to paint today and continue the theme from last sessions alla prima.  I really enjoy painting this red cloth it can be tricky to paint because of its brightest value, one can easily mix white into it and it turn pink instead of bright red.  These pears as stated in the previous post go well with the red cloth.  As you may have noticed already with my alla prima's I enjoy trying to paint texture, painting these pears definitely gave me a run for my money pertaining to textures.  I do enjoy painting smooth surfaces and getting subtle value transitions but I enjoy more trying to paint texture.  Texture definitely takes painting to a different realm, one can feel the surface of the object you'r painting, it gives the impression as if the paintings alive and breathing.  Going beyond just trying to over blend every section of the painting, closely observe the particular object you'r painting and try to paint the texture it has, doing so will give a hint of life to the painting.

I wanted to let you guys know that I'll be doing a portrait painting this Saturday at Art Resource Gallery in Edina, Minnesota.  I'll be doing the painting from a photo, I wish it can be from life but the sitter is 6 years old and the lady who's wanting me to paint the portrait says he wouldn't sit still.  It'll be fun either way and excited for it, I also hope to be done with my largest still life I've ever painting.  Hopefully I'll be done with it and have it there for the painting demo.  

I started with the usual dry brush approach using no mediums and a bit of raw umber on the brush.  After the drawing is complete I filled in the background and red cloth, I started with just the general colors and big form modeling.  For the background I used ultramarine blue, naples yellow and titanium white.  Colors for the red cloth were cad. red light, naphthol red and ivory black.  At this stage I'm concerned with just modeling the form, having the light wrap around the form and keeping the chroma as light as I can in the lighter areas.  
  
After the big form modeling is complete I started to state the smaller forms, I like to break this stage into two sections.  The first section I state the darker values with its specific forms.  Once that's complete I state the lighter values with its specific forms.  

Once the red cloth is complete I start to state the pears with its general colors and big form modeling.  The colors I used for this stage were naphthol red, cad.red light, cad.yellow light, naples yellow, viridian and ivory black.  When the big form modeling is complete I state the smaller form modeling, again first starting with the darker values and their specific forms.

Then I state the lighter values with their specific values and highlights, I also state the stems when the pears are completed.  After the stems is complete I go back around the whole painting and see what needs a finishing touch, after doing that the painting is complete.  I hope you guys enjoyed this one, thanks for stopping by and viewing!  


Tuesday, November 29, 2011

"Grapes & Wine Glass"

Sold
"Grapes & Wine Glass"
7 x 5 in 
Oil on Canvas Panel

Thanksgiving was so well needed the amount of food I ate was just ridiculous but I look forward to it.  Relaxing and being with family is always a nice thing to do, I wasn't able to work on any paintings but did have the chance to finish up some drawings.  I was itching to get back to painting after lounging around and not really doing anything, its nice to relax but to much of it can throw me out of sync. 

 I truly do love painting grapes from their texture to the colors that are deep within their skin, I can't find a bad thing about them.  What I also like about them is that their stem always has a gestural feel to it, its in charge of holding together all these little guys and maintaining a balance with their weight.  As mentioned before their texture is really beautiful to paint, their skin is able to absorb light and retain it with a glowing effect.  Light skims across their form and ever so lightly wraps around it, it's really neat to see the difference between each of them.  I wanted to continue the play with composition that I've been doing lately and introduce a wine glass to the picture, I felt it was fitting to incorporate it with the grapes and also have an opportunity to paint a shiny surface.  As beautiful as they were to paint they were even more delicious to eat afterwards, nothing beats painting one of these and eating them as a reward for being done.

I have exciting news I've been recently picked up by Art Resource Gallery in Edina, Minnesota.  I started showing their last weekend, I'll only be showing larger still life paintings and ball point pen drawings.  If anybody is in the neighborhood you should stop by and check out the artwork.  I also have two new classes at Bloomington Art Center that are being offered for the winter session.  If anyone is interested you can sign up by clicking here for the figure drawing class and here for the oil painting class.   

I started with the usual dry brush approach using no mediums and a bit of raw umber on the brush.  Once the drawing was complete I filled the background in with titanium white, ultramarine blue and cad.red light.  After the background was complete I stated the grapes and their big form modeling, I'm not really concerned with the details at this point just on how the light falls on the form and how dark the darks need to be.  The colors I used for this stage were naphthol red, cad.red light, cad.yellow light, cad. orange and ultramarine blue.   

Once the big form modeling was stated I then start to concentrate on the small form modeling stage, I break this stage down to two sections first stating the darker values with their specific forms.  Once that's complete I start on the second section which is stating the lighter values with their specific forms and highlights.  The reason I like to break this stage down to two sections and start with the darker values first, it lets me see how dark I need to really go and sets up the lighter values for the finish.  It keeps the process controlled it's really easy to just work all around and not really get to a finish, doing it in this manner really allows me to get a quicker finish in a methodical way.

Once the grapes and stem are taken to a close finish I then start on the wine glass by stating the middle to darker values first.  Once thats complete I then state the lighter values and their highlights.  Once I'm finished with the wine glass I can then go back to the grapes and add any finishing touches.  That's the reason I stated that I take the grapes and stem to a close finish because once all the elements are painted you get a better picture on how everything works together, you'r bound to change or add something towards the end.  

Thanks for stopping by and viewing everyone, hope you enjoyed this one!