Showing posts with label Oranges. Show all posts

Thursday, August 22, 2013

Minnesota State Fair

"Evening Tea"
14 x 18 in
Oil on Linen

I'm very proud to announce my painting "Evening Tea" will be on display at the Minnesota State Fair! It's such an honor to be showing at a great venue and with so many talented artist. The Fair opens today August 22 until September 2. Stop by and check a lot of great art on display while eating cheese curds or a bucket of cookies. 

Cheers!

Thursday, February 2, 2012

"Blood Oranges II"

"Blood Oranges II"
6 x 8 in 
Oil on Canvas Panel
Today I wanted to paint these beautiful blood oranges again but this time with a red cloth.  As I've mentioned in previous posts I really enjoy trying to capture the texture of things, today was definitely one of those days were it tested my abilities to do so.  From the wrinkles of the cloth to the soft subtle tones in the oranges and to the grainy wooden board.  All of them unique in their own way but meshing well together.  I was also able to mix my older approach to my new one of course shifting things here and there, for the most part I was pleased the way they worked together.    
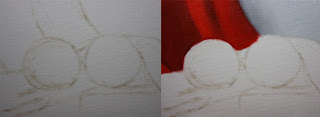
I started with the usual dry brush approach just using a bit of raw umber on the brush and no mediums.  Once the drawing was established I painted the background and the back section of the red cloth.  The colors I used for the background were ultramarine blue, titanium white and naples yellow.  For the red cloth I used naphthol red, cad. red, raw umber and ivory black.  When working in the cloth section I start by just laying in the values with their appropriate colors to match the hue.  I keep the transitions soft and make sure to not have any hard edges, this is my beginning layer and want to keep it as thin as possible.  
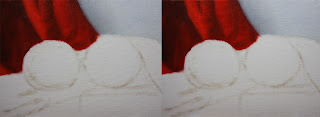
Then I start by adding the darker values and their specific forms, by doing this I start sculpting into the initial layer.  Once the darker forms are about complete I then paint in the lighter values with their specific forms.  By now I start to see the section coming to a completion, I start going back and forth from the darker values and pushing it to compliment the lighter values.  
Then I repeat the same process with the red cloth in the middle ground.
Once that section is complete I then move onto the first blood orange.  I start by painting the big form modeling in which the light is wrapping around the form.  Laying in a close approximation were each value scale should go with the right chroma to compliment it.  I also make sure to keep this stage of the painting thin, making sure the form is turning and it looks dimensional.  The colors I used for this section were cad.orange, cad.yellow pale hue, naphthol red, raw umber and ivory black. 
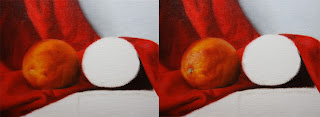
Once the big form modeling is complete I start to state middle to darker values with their specific forms.  When adding the smaller forms in this section I am able to use the initial layer that I stated in the big form modeling stage, this helps my blends go smoother and quicker it keeps a unified look.  It also allows me to go thicker and textured if desired to do so, it gives me the control i'm looking for within each section.  Once that section is about complete I start on the lighter values and highlights.  By the time I get to the end of this stage I am able to go back to the previous section,  I alter some values and chroma's that I didn't notice when the lighter values were not painted.
I repeat the same process with the second blood orange.
Once the blood oranges are complete I then start on the on the wooden board.  First painting the fall of light by keeping the values and colors generalized.  At this stage i'm not looking for details just a generalized information of the light and color.  I also make sure to keep this stage as thin as I can, doing so makes it easier to build layers and keep control.  The colors I used for this stage were raw umber, titanium white, ultramarine blue, cad.orange, and ivory black.
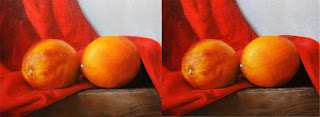
Then I paint in the middle to darker values with their specific forms, I start narrowing in the smaller forms by adding its specific characteristic.  I do the same when adding the lighter values and highlights.  After this stage is complete I go back around and see if I need to push anything or if I've missed a certain part.  I go back into the background and grey it down a bit, I thought it was competing with the foreground for the most part.  Well this painting definitely was a longer one to explain with each of its intricate sections.  It was so much fun painting them and also being able to explain each section, thank you for stopping by and viewing.


Monday, January 30, 2012

"Blood Oranges"

Sold
"Blood Oranges"
6 x 8 in 
Oil on Canvas Panel
I have not painted blood oranges in a while and wanted to challenge myself by painting there subtle and hard textures.  I also was looking forward into painting the reds within the oranges, I think those two combination work well together.  My approach to this painting is different than what I've been doing lately, it's more of the way I painted when I first started doing these alla prima's.  It was nice to change it up and go back to my old approach, I still think it's great to paint in this way it allows you to concentrate in one section and take it to a finish before moving onto the next.  It's easy to just jump around and work on other areas which will just keep you going in circles, this approach allows you to just paint a certain section and not move until its complete.  Time to keep experimenting with my old and new technique, see what I can get from the two once their meshed together.  
I started with the usual dry brush approach using no mediums and a bit of raw umber on the brush.  Once the drawing was complete I stated the background my using ultramarine blue and titanium white.
Then I started by concentrating on one section at a time, normally I would do big form modeling at this stage.  I forced myself not to move from this section until it was completely done.  I started with a thin application of the areas that I was laying in first, slowly I build the thickness and opacity I'm looking for. Once the shadows are complete I move onto the middle to lighter values of the orange.  I'm being sensitive to the brush strokes and edges they create, I want to keep the transitions smooth and not get to thick in the beginning.  The colors I used in this section were cad.orange, naphthol red, cad.red, raw umber, and cad.yellow pale hue.
I then added the highlights to the orange and took it to a complete finish.  When adding the highlights or layers on top of the beginning layers you have to be soft to the touch, try not to pick up the paint that's already laid down, think of it as a build up of layers that's creating a three dimensional illusion.  The softer you apply pressure to the brush the more blend it will create and you also get better brush control.  Once the first orange is complete I move onto the second one, repeating the same process as I did with the first.
Once the second one is complete I move onto the darkest part of the base, I only concentrate in this section and take it to a finish before moving onto the next.  The colors I used were ivory black, raw umber, titanium white, ultramarine blue, and cad.orange.  
I then added the top of the base with its highlights as well, the colors I used in this section were ivory black, raw umber, titanium white and ultramarine blue.  When adding the lighter sections and even the cast shadows I had to be careful with the silhouette of the oranges.  Certain sections you have to just slow down and take your time, this section was definitely one of those instances.  This approach is more time consuming and really forces you to slow down with each section, its great in order to get into that painting mind set.  As mentioned in the opening paragraph i'm looking forward to see how I can mesh this approach with my current one, I'll definitely keep you posted.  Thanks for stopping by and viewing, hope you enjoyed this one.


Thursday, January 5, 2012

"Evening Tea"

"Evening Tea"
14 x 18 in
Oil on Linen
This is my latest still life painting (not an alla prima painting), its of oranges surrounding this beautiful rustic tea kettle resting on a geisha blue cloth and a wooden stool peaking through.  To say I had fun painting this one would be a complete understatement, I wanted to control and manipulate a bit the lighting pattern in my painting.  One thing is to copy from life the other is enhancing what you'r painting and make it your own.  I had this gold frame for a while and glad I was finally able to create a painting worth of it.
I started with getting the setup just right and positioning my canvas to a close sight to size copy I can get to.
I did the drawing in raw umber, concentrated in simplifying the shapes as much as I can and positioning them just right.
Then did a whole underpainting in raw umber, and cremnitz white.  This allows me to get the tone I'm going for and play with the lights a bit.  I usually don't do this when starting a painting but wanted to try something different this time.  This is also good to do if you haven't prepared your canvas with a ground, it gives the linen some tooth.
I started to paint the blue cloth and oranges, as you can see I had to get other oranges because they started to go bad and change colors.  There are many tricks you have to improvise when painting from life especially with still life's pertaining to fruits and vegetables.  This is the last picture I took of the process and apologize for not taking more.  Basically I worked on each section to a finish and brought the whole painting to a finish by repeating this process.  The process I use for my alla prima's I applied to  this painting, I saw how easier it was to achieve difficult transitions in certain areas and have a unity throughout the finish of the painting.    

Just a reminder to everyone you can sign up for my new lesson on how to paint "Pink Roses".  Here's a trailer for it: