Showing posts with label still life. Show all posts

Thursday, July 19, 2018

Classical Still Life

Still Life
2018
Oil on Masonite
24 x 18 in

I've just completed a still life commission for a local interior design firm. It was such a great experience working with them. They gave me this beautiful frame to fill in, even before I started the painting. I felt a little pressure in making the painting as good looking as the frame is. As soon as I got the panel cut to size, I finished the painting with the frame attached to it. This was normal for 19-century painters to do, they could see how the finished painting would appear within the frame. I can say it helped a lot when determining if I was done or not. 


I hope everyone enjoyed this one, thank you for stopping by!

Friday, February 5, 2016

Master Copy

Master Copy From Anthony Van Dyck
11 x 14 in
Oil on Canvas Panel

I've been experimenting with the Flemish technique, again. I am fascinated by the way Peter Paul Rubens and Anthony Van Dyck painted. There are many more other painters I look up to from the past but these two are on the top of my list. My past posts I was dabbling here and there with this technique (click here to view the one I am referring to) , I thought I made some advances but fell short once I started applying it to other paintings. These shortcomings I find very educational as they are not failures, I see them as learning of what not to do for the next painting. The two paintings I am referring to is "The Gypsy Life" and "Eve"  These two paintings were not up to my expectations. I don't dislike the paintings but to the level I want them to be, as of yet they're not there. I learned a lot from them and that is very important to point out. Since completing them I have ventured to different paintings and especially a different direction with my body of work. The new direction of work I am doing now I am wanting to mix with the Flemish technique. That being said I had to go back to the drawing board and figure this technique out. I am not saying I solved it and now I am a master at it, but I do think I am one step closer in understanding it.

In this post I will break down each stage of this technique. I copied Anthony Van Dyck's painting  'Thomas, Viscount Wentworth, later Ist Earl of Strafford' for this demo. I will share everything I learned and how I applied the paints and also mediums to the canvas. I hope you are able to learn as much as I did with this post. 

The canvas panel I used was from Dick Blick. I didn't prepare the canvas to any special modifications as this is just for practice.  I toned the canvas with raw umber and mineral spirits. In the picture above you can see how I lay out the raw umber and mineral spirits ( I circled the placements of the mineral spirits) before I rub them together with a paper towel to get an even tone.


Tone
This is how the results should look, a medium toned canvas which is not too dark or light. If you want to go darker than this you can, but be careful not going too dark. I let this dry until I start the next stage. The drying time should be quick since raw umber is the fastest drying color and also mineral spirits dry extremely quick. You can start the next stage the following day, make sure the painting is dry and does not smear off the canvas.
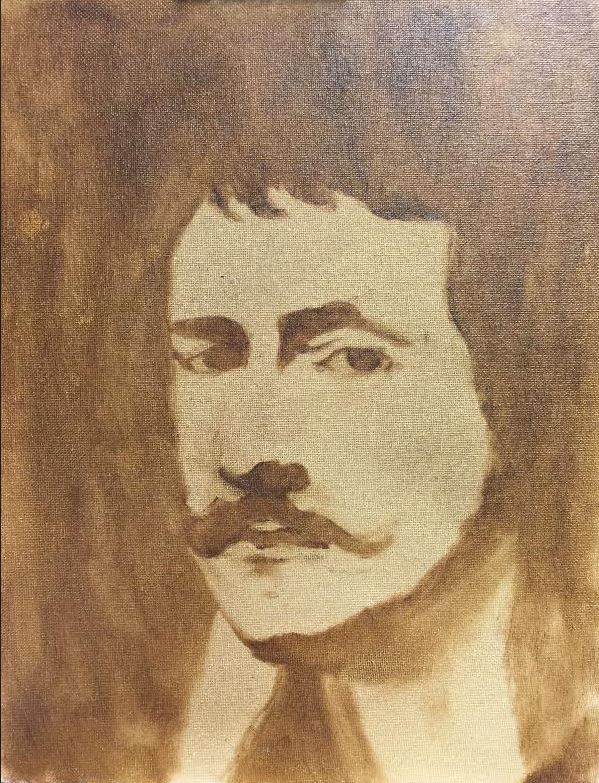
Drawing
Once the canvas is dry I then start drawing light and shadow shapes. With this portrait Anthony Van Dyck simplified these two beautifully. I am using very little paint on my brush and drawing out the shapes to their correct placements. I am using raw umber and mineral spirits in minimal amounts. You do not need to use mineral spirits if you do not want to, as stated before raw umber dries very fast by itself.

Shadow Shapes Fill In
Once the drawing is looking somewhat like the subject I then paint in the shadow shapes or all the dark areas. I leave the light shapes and only fill in the shadow shapes. In this stage I am only using raw umber, you can mix mineral spirits if need be, especially if you have larger areas to cover. Just remember do not use large amounts of paints or large amounts of mineral spirits. You can move on to the next stage on the same day without letting it dry.
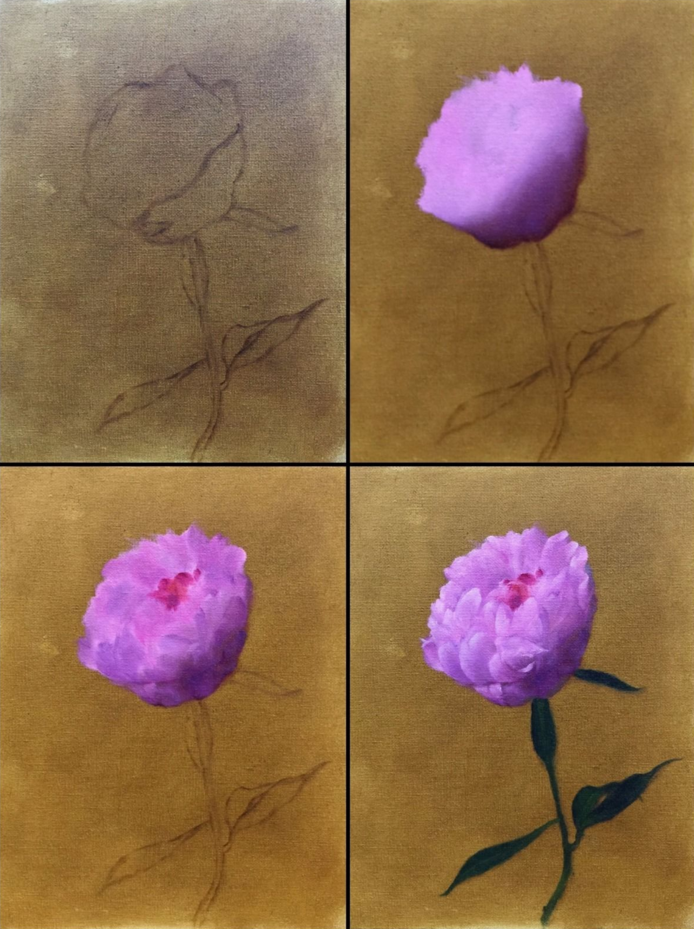
Under painting
In this stage I only paint the values in the light shapes. I do not paint in the shadow shapes just the light shapes. The whole point of this stage is to get all the values right. I use raw umber, titanium white mixed with 2 parts mineral spirits and 1 part linseed oil. I start with minimal amount of paints. painting from thin to thick. I like to keep the high lights thicker to indicate texture. I take the portrait to a finish by rendering each area in the light shapes. Trying to paint the subtle shifts between values. This is important as you are laying the blue print down for when color is added you do not have to worry about proportions and other factors as you would in the under painting stage. You are completing 85 percent of the painting in this stage.  Let the painting dry before moving onto the next stage.
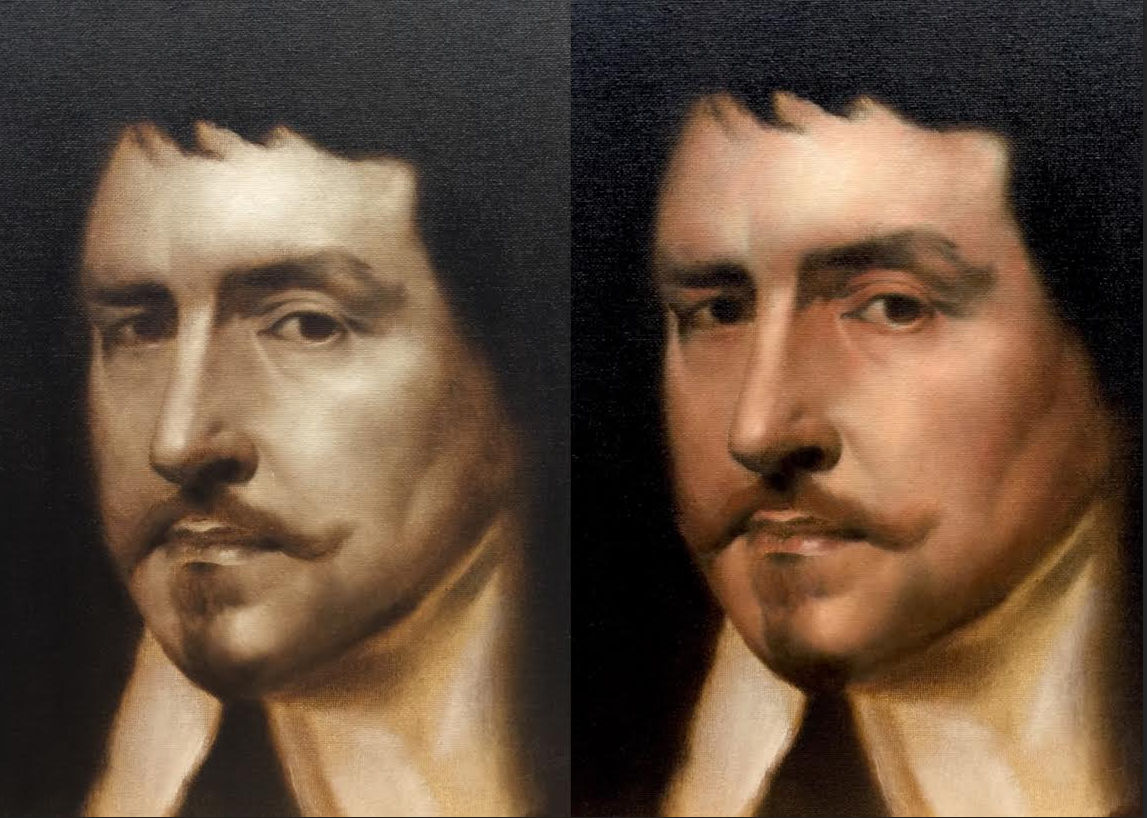
1st Lay In
This stage I start by painting the darkest values first in the background as well in the shadow shapes. I apply the paints thin and build up to the consistency I want (Ivory Black, Raw Umber were used in the darks shapes). Once the darkest values are stated I move onto the middle/lighter values in the light shapes not the shadow shapes (Colors used in this stage were Cadmium Orange, Napthol Scarlet, Burnt Sienna, Naples Yellow, and Titanium White). I scumble the color back and forth without lifting the brush in this stage. Applying the color in thin amounts allows me to control the value of the hue. Since the value underneath is already stated this allows me to concentrate on hue, chroma, and texture. I am using 1 part mineral spirits and 1 part linseed oil.  

2nd Lay in
After the colors are placed in their correct areas I then start taking each area to a finish. I do not scumble at this stage. I am dabbing the brush almost as if they were mini strokes.  I don't use any mediums for this, although you can use linseed oil if need be. The lights generally do not need them but at times you might. I am controlling the chroma and value of the color by just the pressure I am applying to the brush. I then do a second pass with the darks in the background and the hair, this allows me to play with edges where shadow shapes meet the light shapes. Since the shadow shapes tend to sink in more than lighter shapes you can oil in the specific area with minimal amounts of linseed oil. The important thing about this stage is to take each area to a finish and dab the paints rather than scumbling.

This painting in total took about 6 hours to complete from beginning to end. The first thing I learned from this whole experience is the underpainting stage, getting it right is essential for the rest of the painting. This stage allowed me to only worry about the drawing and value and not about color. The second thing I learned is the 2nd lay in stage. Being able to render the color with out worrying about getting the proportion right was very nice. This allowed me to just concentrate on rendering the type of texture I wanted.  As far painting handling dabbing the paints and having the correct pressure was key to getting the rendering I wanted. A great experience overall and glad I was able to document it.

Thank you for stopping by, until next time!


Monday, December 7, 2015

"Peony"
10 x 8 in
Oil on Canvas Panel

I enjoy painting peonies, from their beautiful colors to gestural pedals. Instead of doing a whole arrangement of peonies, I decided to keep it simple and just paint one. The colors as mentioned before is one of the beauties of this plant, its always fun trying to match the radiant colors it gives. Painting the pedals can be challenging as each of them are different. Overall it is a fun plant to paint and a beauty to always come across in the flower store


Thank you for stopping by and viewing. Cheers!

Friday, May 15, 2015

Art Show

"The Gypsy Life"
36 x 48 in
Oil on Canvas

There was a great show this past weekend that I was lucky to be a part of. I showed two new pieces and four older ones. I collaborated with three new pieces as well. It was a lot of work getting ready for this show but worth every moment of it. Here is a great video showcasing opening night of the show and artworks from the other participating artist.

This painting I hold very dear to my heart. I have been wanting to execute this one for about 9 years. Its a story I came up with when living in Florence, Italy. Narrative paintings have always been a direction I wanted to go with. Telling a story and connecting with the viewer with my paintings is something I am getting into and very excited about. 

Closer view of the "The Gypsy Life"

"Eve"
35 x 25 
Oil on Linen

Sorry for the bad picture of this one and of "The Gypsy Life", I am in process of getting these professionally shot. 

The space the event was held at is called "Architectural Antiques". Great venue with so much rich history with every antique item. There was also a band playing while the show was going on. These pictures were taken the day after the opening, I did not have time to take photos of the show on opening night due to how busy it was.

My ball point pen drawings.

This was the space leading to the other side where the bar was and more art work was embedded with surrounding antiques.

Entrance to the show.

One of the main rooms with a couple pieces from Peter Geyen

This was one of the collaboration pieces Peter Geyen and I worked on. I did the painting and Peter completed the sculptures on top. Always great to work with Peter on these projects. 

"Cutting Board"
16 x 20 in
Oil on Canvas

I painted this one about a year ago and finally got it framed. Was excited to show it with the frame for the show.

Another piece Peter and I worked on together. I drew the portrait in oil pastels and Peter completed the rest.


This one was another piece Peter and I completed. I completed the drawing in charcoal on MDF board. What I enjoy about working with Peter is always trying different mediums and different ideas that push me as an artist. 

The show was so much fun to be a part of, by the end of opening night I had no voice and extremely exhausted. Thank you to everyone that made it out and made it such a great event. I am looking forward to many more.

Cheers!

Monday, December 1, 2014

Fuchsia Peonies

Sold
"Fuchsia Peonies"
8 x 10 in
Oil on Canvas Panel

I am well aware Peonies are out of season, These peonies I bought for my wife a while ago and loved how they looked. I took a picture and always said "I will paint that one day" well that day finally came.  The texture and movement within these flowers are spectacular, I tried so hard to portray that in my painting. Fuchsia Peonies are always fun to paint due to the purples, blues and reds that are hidden within each pedal. The movement from one petal to the other has a beautiful gestural quality to it. It is a challenging flower to paint but always rewarding in the end.

Thanks for stopping by, cheers!

Wednesday, November 26, 2014

Leaning Gourd

Sold
"Leaning Gourd"
8 x 10 in
Oil on Canvas Panel

Since the holidays is around the corner I wanted to paint a festive theme. Some people might argue pumpkin is not very festive for this time of year, which is a valid point but I think the colors are fitting.  I want to thank everyone who stops by my blog and takes the time to look at my work. Thank you for doing so. I enjoy sharing my process and thoughts on painting. I know the journey of learning this difficult medium can be long and stressful, if I can share my knowledge to help some people with their journey then I feel I have accomplished something. I am so grateful for the artist I reached out to when I started out on my journey for helping me. I wanted to create a blog where I can do the same and share my knowledge as best as I can. We are all on the same boat trying to decipher this complex language of painting.  Thank you everyone and Happy Holidays!

I started with a thin application of raw umber for the drawing stage. Once the drawing is complete I paint the background and wooden board. I keep colors general in this stage and really thin. 

I start painting in darker value forms to the wooden board. Once that is complete I paint in lighter value forms.

Once the wooden board is complete I start painting in the pumpkin. I first lay in a thin application of the general values, somewhat a big form modeling stage. I go back and forth with the brush without lifting it, I keep the pressure pretty light to control the values. Once that stage is working well I move onto the smaller middle to darker value forms. I apply the paints a little thicker to cover the thinner application but being careful of not getting to thick. I am also conscious on the pressure I am applying to the brush. At this stage I start dabbing the brush for the areas that need finer rendering and when the edges need to get softer I go back and forth with the brush with a very light touch. I like to go back and forth with dabbing and keeping the brush on the canvas. Usually in the later stages I tend to lightly render the areas by dabbing on the brush and then going back and forth with out lifting the brush. This approach allows me to control the values and the level of rendering, it also gives me options with the type of textures I am trying to get. 

I then paint in the middle to lighter forms in the pumpkin. I apply the same rendering approach as mentioned above. Once the pumpkin is complete I start painting the gourd. I first paint the big form modeling by painting in the general values wrapping around the form. At this stage I am not worried about the smaller forms or "details". I am just worried how the value and chroma wraps around the form. 

Once the big form modeling is working well I then paint the smaller middle to darker values forms. I then do the same with the smaller middle to lighter value forms. 

I hope everyone has a wonderful holiday! Cheers!


Thursday, October 23, 2014

Still LIfe Paintings on my Etsy Store

"Cheese Board"
16 x 20 in
Oil on Canvas

"Evening Tea"
14 x 18 in
Oil on Linen

I have created a section to sell my still life paintings at my Etsy store. The prices are a little different than my alla prima paintings, of course these take more time to complete with many levels of paint. 

Enjoy!


Saturday, June 21, 2014

"Cheese Board"

"Cheese Board"
16 x 20 in
Oil on Canvas 

This is a new still life painting I made for an Art Fair I participated a couple weeks ago. I will post more pictures soon of the whole event and the other paintings I showed there. It was nice painting a still life again in the classical method. Setting up the objects and painting them fast enough before they start rotting was a challenge. 

The setup.

Process pics of the grapes and cheese near completion.

The bread also near completion. 

Once the foreground was complete I filled in the background and brought the whole painting together. I was able to soften edges and make objects recede. I was using Ivory Black and knew that it's a slow drier, which is the reason I saved it till the last stage. Once the black was painted in, I then went back to the foreground and keyed up certain values and hues.

Once the painting was complete I was able to enjoy the still life by drinking some good wine with grapes, bread and cheese. Thank you for stopping by and viewing! 


Friday, March 14, 2014

"Star Fruits"

"Star Fruits"
8 x 10 in
Oil on Canvas Panel

Something about the last post must of had an effect on our weather, the temperatures started getting warmer and I am loving every bit of it. Spring is definitely right around the corner, now to just melt all the snow thats accumulated. I wanted to continue the alla prima serious with another painting of star fruits. Their color and texture really attract me. It has a nice variation of smooth and rough texture, not to the touch but more visually. I forgot how much I really enjoy painting alls prima's, I find it to be the same experience as drawing in my sketchbook. It's a way I can just set up a small little still life and just practice away. 


Thank you again everyone for stopping by and viewing my painting. Hope spring is around the corner for you as well.


Sunday, March 9, 2014

"Contact"

"Contact"
8 x 10 
Oil on Canvas

I hope everyone is keeping warm in this brutal winter polar vortex. This winter has tested our patience and hopefully will let up soon. I wanted to do an alla prima painting of these star fruits to remind me summer is around the corner. It was fun painting alla prima again, to try to finish the painting in one sitting was challenging after not doing for a while.  Can't wait to produce more of these alls prima's to get back on the band wagon.


Thank you for stopping and viewing my painting. Stay warm!


Monday, January 6, 2014

"Pink Peonies"

Sold
"Pink Peonies"
12 x 9 in
Oil on Canvas Panel

Happy New Years everyone! I have so much to be thankful for such a wonderful year, excited to see what the future has in store. Can't think of any other way to ring it in other than painting.  I have been wanting to paint for a while and finally after all the holiday festivities I was able to do so. Peonies have always been a personal favorite of mine to paint, their color and texture are a big draw to me. It's a subject in which if you try painting every single hair on a dog it will not work in your favor. Either way it's a challenging subject matter to paint, but always a pleasure to do.

I start with a very thin layer of raw umber, not using any mediums either. I do not use any mediums through out the duration of the painting, I like to keep the toxins level as low as possible. This stage I like to concentrate mainly on the composition and placement of shapes. I am not concerned with details or getting everything perfect, just getting the overall placements in the right areas. Later on through the painting the shapes shift here and there that's why I like to keep this stage fairly loose. You can think of it as a gesture drawing, not concerned with proportions or details, just the sole of the drawing, the movement of life through out the drawing. 

Once the drawing is complete I then start with the peonies and its stems. This is the big form modeling stage. I am only concerned with getting the overall chroma and the turning of the form correct. Still not worried about details, just turning the form with the lights and correct chroma.

Once the big form molding stage is complete I then start with smaller form modeling. In order for this stage to work the big form modeling needs to be correct. I have found with a lot of my students they like to rush through this step. The importance of getting that stage right is overlooked at more often than not. Smaller form modeling is just a miniature version of big form modeling. 

I am still not completely done with smaller form modeling since the background and leaves are not done. I lay in the background and really like how it pushes the peonies forward.

I keep going back and forth with the small form modeling stages through out the peonies and leaves. The painting is finally complete and really satisfied with it. These peonies get me excited for the summer after these sub zero temperatures we are experiencing. 

Thank you for stopping by and viewing, wishing everyone a Happy New Years!