Showing posts with label Portrait. Show all posts

Wednesday, May 31, 2017

Master Copy

Sold
Master Copy From Anthony Van Dyck
11 x 14 in
Oil on Canvas Panel

I've been experimenting with the Flemish technique, again. I am fascinated by the way Peter Paul Rubens and Anthony Van Dyck painted. There are many more other painters I look up to from the past but these two are on the top of my list. My past posts I was dabbling here and there with this technique (click here to view the one I am referring to) , I thought I made some advances but fell short once I started applying it to other paintings. These shortcomings I find very educational as they are not failures, I see them as learning of what not to do for the next painting. The two paintings I am referring to is "The Gypsy Life" and "Eve"  These two paintings were not up to my expectations. I don't dislike the paintings but to the level I want them to be, as of yet they're not there. I learned a lot from them and that is very important to point out. Since completing them I have ventured to different paintings and especially a different direction with my body of work. The new direction of work I am doing now I am wanting to mix with the Flemish technique. That being said I had to go back to the drawing board and figure this technique out. I am not saying I solved it and now I am a master at it, but I do think I am one step closer in understanding it.

Thanks for stopping by and always for your continuous support!

Monday, February 13, 2017

Portrait Painting Workshop


Hi everyone, I'm very excited to announce my first ever workshop! This workshop is solely dedicated to teaching the techniques of the masters in portrait painting. 

This will be held in Minneapolis, Minnesota from April 7, 8, and 9, 2017.

 If you are interested in attending and want more information please click here: 


Cheers!

Tuesday, January 17, 2017

Portrait of Marten Pepijn after Anthony Van Dyke

"Portrait of Marten Pepijn after Anthony Van Dyke"
2017
Oil on Masonite 
12 x 9 inches

As you guys might know I am huge fan of Anthony Van Dyke, this painting is after one of his masterpieces. The difference with this painting from the past ones is the surface and preparation. I was able to get two large sheets of Masonite board ($4.00 each sheet) cut to size at Home Depot for free. I have about 40 panels ranging from 8 x 10 to 9 x 12 inches, this is considerably a cheaper route especially knowing I only spent $9.50 after taxes for all those panels. I gessoed and sanded each panel to the level of smoothness I want. It does take a little time to get it set up right but well worth it.  After the gesso has dried I rub raw umber with mineral spirits all around the panel until there is a even medium tone. Once the raw umber as dried I start painting with thin paints progressively getting thicker with each stage. Painting on such a smooth surface compared to the cotton canvases I am used to was an adjustment. I got a lot out of this painting, and excited to continue painting on these panels moving forward.

Process Pics:
 

Thank you for stopping by!

Friday, January 6, 2017

After Ribera

"After Ribera"
2017
Oil on Canvas Board
10 x 8 inches

This painting was copied after Jusepe de Ribera, a prominent Spanish painter from the 1600's. I've only copied a portrait of his in ball point pen but never in oils. This painting was not completed in one session, it was completed in a span of two sessions with ten hours in total. I also documented the whole process through live streaming on Instagram.

Process pics:


Thank you for stopping by and Happy New Years!


Saturday, December 3, 2016

Absence


"Master Copy From Anthony Van Dyck"
2016
Oil on Canvas Panel
11 x 14 inches

I have to start out this post by apologizing, I have neglected blogging for so long. There has been to much time between my last post and now.  So much has happened between now and then, not sure where to start?  I am currently enrolled at MCAD pursuing my MFA in painting/drawing. Going back to school has been challenging after being away for so long. Challenging in a good way, my colleagues and professors push me to get better every day. I am constantly around so many artist who all have different practices and not one is alike, this diversity brings fresh perspectives. I started in late August and can not believe the first semester is almost complete. The duration of the MFA program is two years, excited to see how this experience will influence my work during this journey. 

Since I have given you snippet of what I've been doing I also want to mention that I will attempt to get back into doing daily paintings. I do not expect to produce one every day but attempt to one or two minimum per week. I wanted to get back into having my paintings accessible through ebay as well, which is why I am selling this painting. 

Thank you for taking the time to read my ramblings and hope you enjoyed the painting.

Friday, February 5, 2016

Master Copy

Master Copy From Anthony Van Dyck
11 x 14 in
Oil on Canvas Panel

I've been experimenting with the Flemish technique, again. I am fascinated by the way Peter Paul Rubens and Anthony Van Dyck painted. There are many more other painters I look up to from the past but these two are on the top of my list. My past posts I was dabbling here and there with this technique (click here to view the one I am referring to) , I thought I made some advances but fell short once I started applying it to other paintings. These shortcomings I find very educational as they are not failures, I see them as learning of what not to do for the next painting. The two paintings I am referring to is "The Gypsy Life" and "Eve"  These two paintings were not up to my expectations. I don't dislike the paintings but to the level I want them to be, as of yet they're not there. I learned a lot from them and that is very important to point out. Since completing them I have ventured to different paintings and especially a different direction with my body of work. The new direction of work I am doing now I am wanting to mix with the Flemish technique. That being said I had to go back to the drawing board and figure this technique out. I am not saying I solved it and now I am a master at it, but I do think I am one step closer in understanding it.

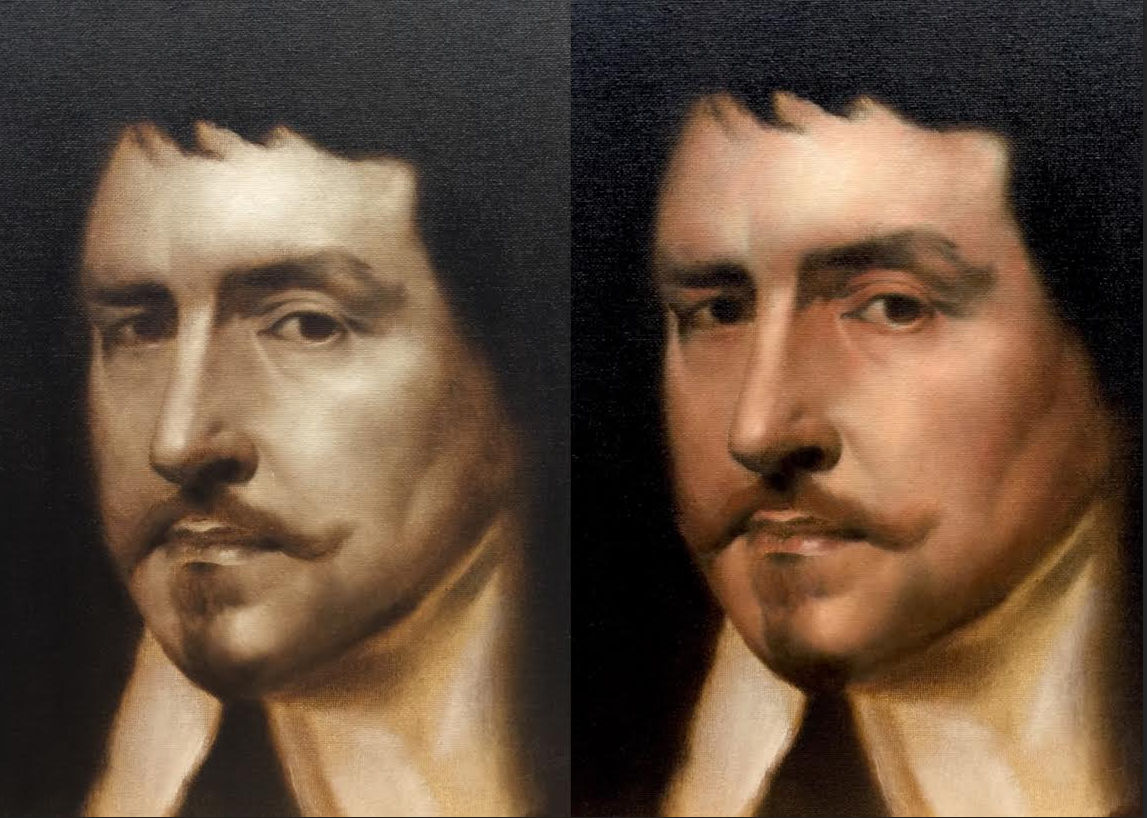
In this post I will break down each stage of this technique. I copied Anthony Van Dyck's painting  'Thomas, Viscount Wentworth, later Ist Earl of Strafford' for this demo. I will share everything I learned and how I applied the paints and also mediums to the canvas. I hope you are able to learn as much as I did with this post. 

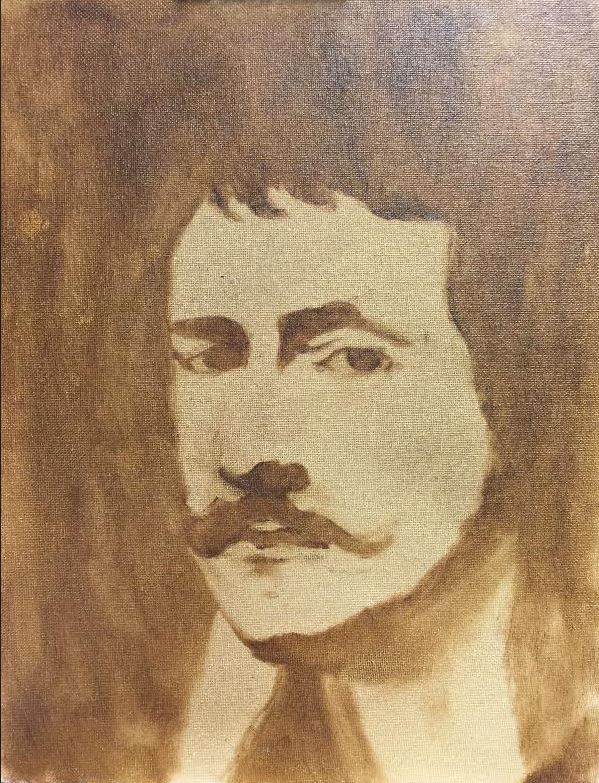
The canvas panel I used was from Dick Blick. I didn't prepare the canvas to any special modifications as this is just for practice.  I toned the canvas with raw umber and mineral spirits. In the picture above you can see how I lay out the raw umber and mineral spirits ( I circled the placements of the mineral spirits) before I rub them together with a paper towel to get an even tone.


Tone
This is how the results should look, a medium toned canvas which is not too dark or light. If you want to go darker than this you can, but be careful not going too dark. I let this dry until I start the next stage. The drying time should be quick since raw umber is the fastest drying color and also mineral spirits dry extremely quick. You can start the next stage the following day, make sure the painting is dry and does not smear off the canvas.

Drawing
Once the canvas is dry I then start drawing light and shadow shapes. With this portrait Anthony Van Dyck simplified these two beautifully. I am using very little paint on my brush and drawing out the shapes to their correct placements. I am using raw umber and mineral spirits in minimal amounts. You do not need to use mineral spirits if you do not want to, as stated before raw umber dries very fast by itself.

Shadow Shapes Fill In
Once the drawing is looking somewhat like the subject I then paint in the shadow shapes or all the dark areas. I leave the light shapes and only fill in the shadow shapes. In this stage I am only using raw umber, you can mix mineral spirits if need be, especially if you have larger areas to cover. Just remember do not use large amounts of paints or large amounts of mineral spirits. You can move on to the next stage on the same day without letting it dry.

Under painting
In this stage I only paint the values in the light shapes. I do not paint in the shadow shapes just the light shapes. The whole point of this stage is to get all the values right. I use raw umber, titanium white mixed with 2 parts mineral spirits and 1 part linseed oil. I start with minimal amount of paints. painting from thin to thick. I like to keep the high lights thicker to indicate texture. I take the portrait to a finish by rendering each area in the light shapes. Trying to paint the subtle shifts between values. This is important as you are laying the blue print down for when color is added you do not have to worry about proportions and other factors as you would in the under painting stage. You are completing 85 percent of the painting in this stage.  Let the painting dry before moving onto the next stage.

1st Lay In
This stage I start by painting the darkest values first in the background as well in the shadow shapes. I apply the paints thin and build up to the consistency I want (Ivory Black, Raw Umber were used in the darks shapes). Once the darkest values are stated I move onto the middle/lighter values in the light shapes not the shadow shapes (Colors used in this stage were Cadmium Orange, Napthol Scarlet, Burnt Sienna, Naples Yellow, and Titanium White). I scumble the color back and forth without lifting the brush in this stage. Applying the color in thin amounts allows me to control the value of the hue. Since the value underneath is already stated this allows me to concentrate on hue, chroma, and texture. I am using 1 part mineral spirits and 1 part linseed oil.  

2nd Lay in
After the colors are placed in their correct areas I then start taking each area to a finish. I do not scumble at this stage. I am dabbing the brush almost as if they were mini strokes.  I don't use any mediums for this, although you can use linseed oil if need be. The lights generally do not need them but at times you might. I am controlling the chroma and value of the color by just the pressure I am applying to the brush. I then do a second pass with the darks in the background and the hair, this allows me to play with edges where shadow shapes meet the light shapes. Since the shadow shapes tend to sink in more than lighter shapes you can oil in the specific area with minimal amounts of linseed oil. The important thing about this stage is to take each area to a finish and dab the paints rather than scumbling.

This painting in total took about 6 hours to complete from beginning to end. The first thing I learned from this whole experience is the underpainting stage, getting it right is essential for the rest of the painting. This stage allowed me to only worry about the drawing and value and not about color. The second thing I learned is the 2nd lay in stage. Being able to render the color with out worrying about getting the proportion right was very nice. This allowed me to just concentrate on rendering the type of texture I wanted.  As far painting handling dabbing the paints and having the correct pressure was key to getting the rendering I wanted. A great experience overall and glad I was able to document it.

Thank you for stopping by, until next time!


Tuesday, June 24, 2014

"Rubens" Ball Point Pen

Rubens Copy
3 x 5 in
Ball Point Pen

This drawing started as an experiment to try out a new sketchbook I bought.  I used a heavy weight drawing paper sketchbook by Bee Paper Company Professional Series. It was tough trying to get textures with the drawing because the paper was not as smooth as I usually draw on. I welcomed the challenge and enjoyed deciphering it.  I was not to fond of the graininess in the beginning but ended really liking how it meshed with the drawing in the later stages. This drawing is after Peter Paul Rubens "Two Satyrs". The expression Rubens created with this portrait is amazing. He definitely is one of my all time favorite painters I look up to and inspire to paint/draw like.

 Thank you for stopping by!


Monday, August 19, 2013

Rupert Brooke

Sold
"Rupert Brooke"
9 x 11 in
Ball Point Pen 

I wanted to thank you all for your nice comments from my last post, I really did not expect all your responses. Especially being gone for so long, thank you again everyone!

I did this Ball Point Pen drawing of Rupert Brooke, a famous English poet known for his idealistic war sonnets written during the First World War. Rupert Brooke was not photographed often and there are rare photos of him. He was an amazing poet for his time and even till today. I can't imagine if he would of lived beyond the age of 27 what other masterpieces he would of produced. I usually do ball point pen drawings in a really small format, but this was way out of the ordinary. I wanted to try something different by going bigger. I'm glad I did but it was a lot of work. When building up layers with ball point pen you have to be very careful by not pressing to hard with the pen or you'll get blobs of ink. It was a challenge to build up these subtle layers in such a large format.  I had a lot of fun with this one, not sure if I wanna go this big again but won't turn it down if it came my way.

Drawing and painting are relative, if you know how to draw then you can paint. I approach a painting the same way I do with a ball point pen. Always think about form, and how light wraps around the form.

Monday, February 25, 2013

Commissioned Painting

16 x 20 in
Oil on Canvas 

This painting was done for a client a while ago and finally got the approval to post it.  It was a lot of fun creating this painting from beginning to end.  This painting is completely opposite to what I usually paint but I like being challenged and I feel this was a great challenge.  

I started with a sketch with what I thought the client was looking for.

After sending the original picture to the client, I made revisions to the hair and thorns.

Then made more revisions to the thorns, in the other picture she started appearing more like the statue of liberty.

Once the drawing phase is approved I went straight to the portrait and started carving out the forms.

I continued all the way to the arms and chest area, sending pictures of each stage to the client making sure they approve.

Then I added the shirt and blood to the figure which were the finishing touches.

Detail.

Thanks for stopping and viewing, hope you enjoyed! 


Monday, December 31, 2012

Painting at the cabin

We are at the cabin for New Years to celebrate with friends and family. It's about a two hour drive north from Minneapolis in a small town named Alexandria, when you arrive it's pure beauty from every direction. Growing up in Florida I never knew about having a cabin, since moving to Minnesota I've learned what it is and appreciate it. Every time we come to the cabin I never paint as much as I want to, this time I feel l I'm finally producing the amount I should be doing. These paintings I am doing are on the spot and completed within the hour, more or less. I am able to treat these paintings as drawings in my sketchbook. The first painting is of Greg playing the guitar, he was practicing the whole time and I don't think he even realized I was painting him. It was fun listening to him play great music and see the passion he has for it. The second painting I did is the view from the cabin looking out to the lake. When I was painting I was fortunate to see our friends playing on the ice and digging some ice fishing holes. I tried capturing those moments in the painting. I hope to produce more of these little guys while I'm up here, they're great visual memories to look back at. Happy New Years!


Thursday, December 27, 2012

"Ivan Kramskoy Copy"

"Copy after Ivan Kramskoy"
10 x 8 in
Oil on Canvas Panel

I hope everyone had a great holiday season, I cannot believe the year is almost over.  This Christmas I had a great time with family and friends.  I was happy to also paint and enjoy the time with everyone, I would sneak in a couple sessions when the ladies were in the kitchen cooking.  I always seem to go back to Kramskoy whenever I need to practice, his portraits are captivating and his technique is breathtaking.  I never regret doing these little studies I learn from them with each session.  I will post other studies I did from Kramskoy in later post.  

I did not take any process pictures other than this one.  This a good description how I develop a portrait.

Happy Holidays everyone and a Happy New Year!


Wednesday, April 4, 2012

"The Butcher"

Contact me if interested in purchasing
"The Butcher"
7 x 5 in
Ball Point Pen

This portrait is of our local butcher that I have been wanting to draw for quit some time now.  I stopped him one day and finally had the courage to ask him to pose for me, to my delight he agreed.  I enjoyed drawing this portrait for many reasons, one of which is that I know this person but at the same time I really don't know him that well.  To try to capture him through the drawing was a challenge in that aspect, but since seeing him so much at the store I feel like I got a good idea of his personality.  I wanted to keep the background blank to frame the portrait and have all the contrast in the center.  To say I enjoyed this drawing is an understatement I hope to do more of these in the near future.  Thanks for stopping by hope you enjoyed!