Showing posts with label alla prima painting. Show all posts

Wednesday, December 7, 2016

Fuyu Persimmons

"Fuyu Persimmons"
2016
Oil on Canvas Panel
8 x 10 inches

It was neat being back at the grocery store and searching what to paint rather than what to eat, I can't remember the last time I did that. I noticed the practice of putting together the whole picture from beginning to end was something I really missed. Finding the subject, then composing it (which can take a while), then either painting from life or taking a picture, document the process while painting it, and last but not least finish the painting in one session. Daily or Alla Prima painting is great practice no matter what style your painting in. I have and will always recommend everyone to at least try it, its the best way to practice and hone your skills as a painter.

Here is a step by step process:

Thank you for stopping by!


Monday, December 7, 2015

"Peony"
10 x 8 in
Oil on Canvas Panel

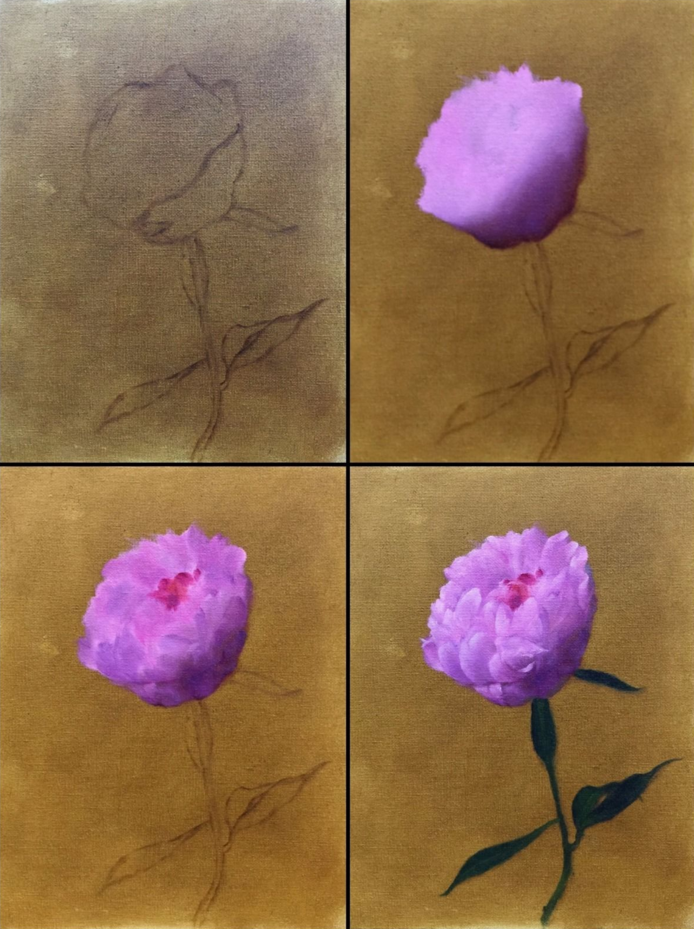
I enjoy painting peonies, from their beautiful colors to gestural pedals. Instead of doing a whole arrangement of peonies, I decided to keep it simple and just paint one. The colors as mentioned before is one of the beauties of this plant, its always fun trying to match the radiant colors it gives. Painting the pedals can be challenging as each of them are different. Overall it is a fun plant to paint and a beauty to always come across in the flower store


Thank you for stopping by and viewing. Cheers!

Tuesday, June 16, 2015

Peonies

Sold
"Peonies"
8 x 10 in
Oil on Canvas Panel

I have posted this painting before but have not offered it for sale. If you are interested bid on it through my ebay page.

Cheers!

Tuesday, May 19, 2015

Edina Art Fair

"Peonies"
8 x 10 in
Oil on Canvas Panel

Back to the easel into producing more art work for the Edina Art Fair.  The fair will be from June 5 -7. Last year was my first time showing and it was a lot of fun participating in the event. The amount of people I met and got feedback from was immense. I recommend anyone who has never been a part of one to do it, it is a great experience.

It is that time of year that peonies bloom for about two weeks. It's a short window but I want to take advantage of it. They are one of the most beautiful flowers to paint. Peonies are always a challenge to paint in one session because of their intricacy, but is one of the main reasons I am attracted to paint them. 

You can see with the process shots above I went with big form modeling of the lights for all three Peonies. I was not interested in details until the hue and chroma were stated overall. I was working from general to smaller forms. Starting right away with details will hurt your painting. Work with larger shapes then working into smaller shapes. Which is the same as doing big form modeling first then completing the painting with smaller form modelling. Edges are also another key component with this painting. I left some edges blurry to push the middle main Peonies forward. I stress to my students how important edges are, they will either make or break your painting. Transitions from one value or chroma to another depends greatly on the edges and how fluid the transition is. 

I like to paint peonies from life as you can see all their true colors. Which goes with anything you want to paint, photography looses a lot of the colors and distorts the picture. I do use at times photography if I have no option and will paint into the night. I always prefer painting from life with natural light when I am able to. This is another painting I am doing for the art fair. Peonies open their pedals so quick, by the time I was getting closer to finishing this painting the white Peonies that I painted was already half way blooming. 

Thank you everyone for stopping by and viewing my paintings, cheers!


Monday, December 1, 2014

Fuchsia Peonies

Sold
"Fuchsia Peonies"
8 x 10 in
Oil on Canvas Panel

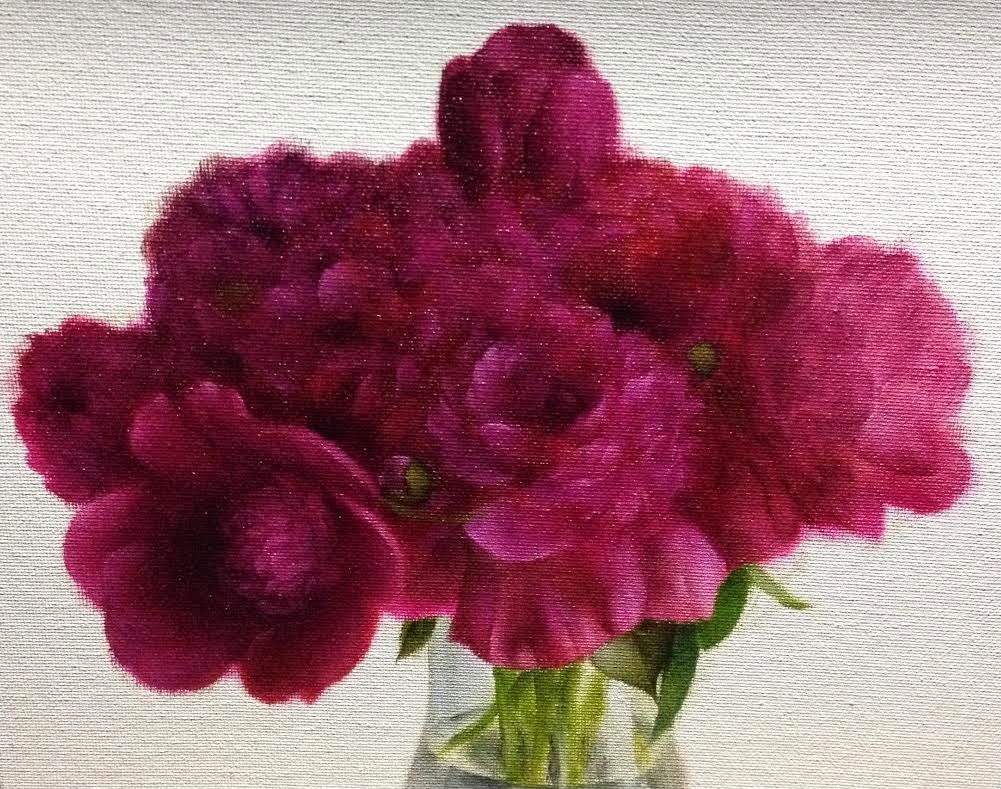
I am well aware Peonies are out of season, These peonies I bought for my wife a while ago and loved how they looked. I took a picture and always said "I will paint that one day" well that day finally came.  The texture and movement within these flowers are spectacular, I tried so hard to portray that in my painting. Fuchsia Peonies are always fun to paint due to the purples, blues and reds that are hidden within each pedal. The movement from one petal to the other has a beautiful gestural quality to it. It is a challenging flower to paint but always rewarding in the end.

Thanks for stopping by, cheers!

Wednesday, November 26, 2014

Leaning Gourd

Sold
"Leaning Gourd"
8 x 10 in
Oil on Canvas Panel

Since the holidays is around the corner I wanted to paint a festive theme. Some people might argue pumpkin is not very festive for this time of year, which is a valid point but I think the colors are fitting.  I want to thank everyone who stops by my blog and takes the time to look at my work. Thank you for doing so. I enjoy sharing my process and thoughts on painting. I know the journey of learning this difficult medium can be long and stressful, if I can share my knowledge to help some people with their journey then I feel I have accomplished something. I am so grateful for the artist I reached out to when I started out on my journey for helping me. I wanted to create a blog where I can do the same and share my knowledge as best as I can. We are all on the same boat trying to decipher this complex language of painting.  Thank you everyone and Happy Holidays!

I started with a thin application of raw umber for the drawing stage. Once the drawing is complete I paint the background and wooden board. I keep colors general in this stage and really thin. 

I start painting in darker value forms to the wooden board. Once that is complete I paint in lighter value forms.

Once the wooden board is complete I start painting in the pumpkin. I first lay in a thin application of the general values, somewhat a big form modeling stage. I go back and forth with the brush without lifting it, I keep the pressure pretty light to control the values. Once that stage is working well I move onto the smaller middle to darker value forms. I apply the paints a little thicker to cover the thinner application but being careful of not getting to thick. I am also conscious on the pressure I am applying to the brush. At this stage I start dabbing the brush for the areas that need finer rendering and when the edges need to get softer I go back and forth with the brush with a very light touch. I like to go back and forth with dabbing and keeping the brush on the canvas. Usually in the later stages I tend to lightly render the areas by dabbing on the brush and then going back and forth with out lifting the brush. This approach allows me to control the values and the level of rendering, it also gives me options with the type of textures I am trying to get. 

I then paint in the middle to lighter forms in the pumpkin. I apply the same rendering approach as mentioned above. Once the pumpkin is complete I start painting the gourd. I first paint the big form modeling by painting in the general values wrapping around the form. At this stage I am not worried about the smaller forms or "details". I am just worried how the value and chroma wraps around the form. 

Once the big form modeling is working well I then paint the smaller middle to darker values forms. I then do the same with the smaller middle to lighter value forms. 

I hope everyone has a wonderful holiday! Cheers!


Tuesday, November 25, 2014

Green Heirloom Tomato

Sold
"Green Heirloom Tomato"
5 x 7 in
Oil on Canvas Panel

I have not painted these little gems in a while. The color of this heirloom caught my eye right away. They have such intense pure colors. What I enjoy most is the subtle values between the colors from one area to the other, painting that is challenging and rewarding once it's achieved. Painting light wrapping around this form is challenging but very educational to try. After painting this tomato my wife added it to our dinner which was as delicious as it looked. 

I started with the drawing stage by just using a bit of raw umber on the brush. Thinking of it as one would draw with a pencil. The pressure you apply to the brush it effects the value and intensity your marking will be. Once the drawing stage is complete I add local colors to the whole painting. This allows me to see how the painting will look in the completed stage with the colors I am thinking of. The next stage I then start to fill in the middle to darker values to all the objects in the painting, from the wooden board to the heirloom tomato. Then I add the lighter value forms to tie everything together. With this technique, especially being in alla prima, one has to has to be careful with the amount of paint being applied from the initial stages. Remember fat over lean, you want to start thin and get progressively thicker towards the finishing. I am also conscious of how many pressure I apply to the brush, as stated before I think of it as drawing with a pen or pencil. The lighter the pressure the lighter the value will be, the harder the value the darker the value will be. This also allows you to control smoother transitions. 

Thank you for stopping by and viewing. Cheers!

Tuesday, November 18, 2014

Forelle Pear

Sold
"Forelle Pear"
5 x 7 in
Oil on Canvas Panel

I haven't painted pears in a while and thought it was time to re visit these beauties. I also wanted to go back on how I painted pears when I first started to do alla prima paintings a couple years ago. It's minimal amount of paint on the brush kind of like drawing with a pencil, you do not want to put a dark hard line with the initial mark. This painting is an exploration of my technique old and new.

I started with a thin application of raw umber for the drawing stage.  I am not worried about details just the placement of major shapes and the lineation of shadow shapes. Then I painted the background in. I usually like to paint this area first, this allows me to now worry about it when I am painting the main object in the painting.

Once the background was filled in I then painted in the wood, I applied a thin amount of paint to cover the base. I think of it as how one would when drawing with a pencil. I do not paint in the darkest darks or lights lights, just an in between value to give form to the object. Then I paint in the darkest values. I still have not applied any lighter values just concentrating on the middle to darker values.

Once the darks are painted I then start to paint in the middle to lighter values. Once the base is at a level I am satisfied with I move onto the pear. The initial stage of painting the pear I apply a thin layer of paint in the shadows, I do the same with the lights. In this stage I am only concentrating on big form modeling, how light wraps around the form. I mesh the lights into the darks to make the form turn, softening edges to show more of the turn. I am not worried about details at this stage just worried on applying a thin layer of paint and making the form turn with generalized colors.

Once big form modeling is working I then start to work on middle to darker values. As I mentioned before I am applying the paints very thin, this allows me to control values the same way one would control a mark with a pencil. I like to build into my darks as well into the lights.  This approach is time consuming but gives you control on how much subtle values shifts you're needing.

Hope you enjoyed this painting, thank you for stopping by! Cheers!

Monday, October 27, 2014

Pumpkin & Gourd

"Pumpkin & Gourd"
4 x 6 in 
Oil on Canvas Panel

I wanted to stay on the theme of gourds and include a pumpkin. I couldn't just leave the gourd by itself, included the pumpkin as a central focus with a dominating presence. The story can go many ways when reading into the painting, its definitely behold of the viewer.


I started with a dry brush approach by just using raw umber and no mediums. In this stage I want to get the drawing as close as I can get it. When I start painting I want to make sure the drawing is as close to it as possible.

Once the drawing is complete I painted in the background and wooden base with its local colors. Once I painted the local colors in I painted the lighter values in the wooden base to give it more form. I want to take the wooden board to a close finish this will allow me to concentrate on the pumpkin and gourd and now worry about coming back and finishing it.

Once the wooden board is complete, I started to lay in local colors on the pumpkin and gourd. I apply a thin coat of paint trying not to go thick, remember fat over lean. In this stage I also paint big form modeling with the local colors. This allows me to concentrate how light wraps around the form. I am not worried about the smaller forms or "details" just how light wraps around the form. I am also keeping the values in a middle tone, not going to light or to dark. I'll apply the dark's and lights in the smaller form stages. I like to spend a lot of time in this stage getting it right, if it works well in this stage then the subsequent stages will go by smoother.

Once the local colors are working with the big form modeling, I then start to paint the darker smaller forms. I start to apply the darkest tones as well in this stage which will make certain sections look brighter.


Once the darker smaller forms are complete I then paint the lighter smaller forms . I repeat the same process as I did with the darker forms by putting in the lightest values. 

Hope you enjoyed this one, thanks for stopping by!

Sunday, October 26, 2014

Gourds

"Gourds"
6 x 6 in
Oil on Canvas Panel

My wonderful wife loves decorating around the house according to the seasons. She put these gourds on the dinning table a while ago and of course it caught my interest. This painting was done quicker than normal, it took me 2 and a half hours to complete. 


The first image, top left, is drawn with a dry brush approach just using raw umber. The second image, top right, I filled in the whole painting with local colors of each area. I filled in the gourds with its local colors and started with big form modeling. This is my area of focus which is the reason I went a little further in the initial stage.  The third image, bottom left, I worked with smaller forms after big form modeling was complete. The fourth image, bottom right, I approached painting the wooden board the same way I did with the gourds, first painting in the darks then the lights. 

Thank you for viewing, hope you enjoyed. Cheers!

Friday, October 24, 2014

Portrait Sketch

Sold
"Edward"
8 x 10 in
Oil on Canvas Panel

I painted this portrait at my Thursday evening figure drawing class. The portrait was completed in 4 hours. I love teaching and when I am able to draw/paint next to my students it's just a dream come true. I remember being in class at Ringling College of Art and Design and my favorite figure drawing teacher, Fiore Custode, used to teach us and draw next to us. Really enjoy when I am able to do the same. 


I am teaching at the Bloomington Art Center on Thursday evenings from 6:30 - 9:00 p.m. If anyone is interested click here to get more information.

Cheers!


Tuesday, September 2, 2014

Plein Air-ing it

"Alexandria"
10 x 8 in
Oil on Canvas

I love long weekends especially at the cabin with family and friends. Sleeping was the number one thing in the agenda and I am happy to say that I succeeded. Second to sleeping was continuing my journey with plein air paintings. As I mentioned in previous post landscapes are not my strong suit, but I do have an admiration for them and enjoy painting them any chance I can. I wanted to try to capture the time of day as fast as I can without having the distraction of putting every hair on a dog.  My goals were to capture the time of day, mood in the painting, and edit my process.


Similar to my previous post, I started with the top left picture with just a quick gesture of the landscape. I only want to capture the essence of the scene and its perspective. The top right picture shows my next step, this stage I only ad the overall tones for each section of the painting. This stage I like to call the "rough" in stage, still going quick to capture the type of light I want, similar to doing gestures but with color. This stage allows me to see how the overall color and mood that will be in the final painting. I want to try to keep close to this palette the further I move away from this stage and closer to the final. The bottom left picture I start to zero in on a section and take it to a finish. I first start with the darker values and move to the lighter values. In this stage I am taking the tree's in the foreground and the tree's in the background to a close finish. Then on the bottom right picture I complete the lake and sky, repeating the same process in working from dark to lighter values.  When all the shapes and values are stated in the painting and close to a finish I can then go around and put the finishing touches. 


Painting on location.


Here is another painting I did when the sun was starting to set the previous day. This was a really quick painting as the clouds were going in and out. The size of this painting is 5 x7 inches, being restricted to that size allows you to go much quicker.

Thank you again for stopping by and viewing. I hope you enjoyed this post and the paintings. Till next time, cheers!


Friday, August 29, 2014

Plein Air Painting

 
9 x 12 in
Oil on Canvas Panel

I went up north to Park Rapids, Minnesota for vacation. Every year I go up I always leave saying "I wish I brought my paints with me!", finally I did! I am the first to tell you that painting landscapes have always been a weakness of mine. I do love them I just do not do them enough, maybe once or twice a year I'll get out and paint a landscape. Going to Park Rapids I wanted to change that and at least do a couple landscapes.


Experiencing nature when you're outdoors painting is something that I truly enjoyed. I would recommend everyone to do it as much as they can. With this process I wanted to lay down the tone or mood of the painting right away. After the initial drawing I painted each section with their general tones, not worrying about details just laying in the overall tones. Doing this allows me to see a "rough' draft of how the final will look, it also lets me get the tones down quicker especially for plein air painting. As I stated in my previous post the "rough" in stage does not mean scumbling paint everywhere in a messy way. I am still thinking of smooth transitions, edges and paint quality. At this stage I also keep the paints thin as I will be adding more layers when putting in the smaller forms or "details". Once the "rough" in stage is complete I start section by section in completing the painting, going from darker to lighter forms. I like to make sure each section is to a close finish as I can take it before moving onto the next section. Once all sections are completed I look at the painting as a whole and put the final touches so the painting can be cohesive.

Till next time, cheers!

Monday, January 6, 2014

"Pink Peonies"

Sold
"Pink Peonies"
12 x 9 in
Oil on Canvas Panel

Happy New Years everyone! I have so much to be thankful for such a wonderful year, excited to see what the future has in store. Can't think of any other way to ring it in other than painting.  I have been wanting to paint for a while and finally after all the holiday festivities I was able to do so. Peonies have always been a personal favorite of mine to paint, their color and texture are a big draw to me. It's a subject in which if you try painting every single hair on a dog it will not work in your favor. Either way it's a challenging subject matter to paint, but always a pleasure to do.

I start with a very thin layer of raw umber, not using any mediums either. I do not use any mediums through out the duration of the painting, I like to keep the toxins level as low as possible. This stage I like to concentrate mainly on the composition and placement of shapes. I am not concerned with details or getting everything perfect, just getting the overall placements in the right areas. Later on through the painting the shapes shift here and there that's why I like to keep this stage fairly loose. You can think of it as a gesture drawing, not concerned with proportions or details, just the sole of the drawing, the movement of life through out the drawing. 

Once the drawing is complete I then start with the peonies and its stems. This is the big form modeling stage. I am only concerned with getting the overall chroma and the turning of the form correct. Still not worried about details, just turning the form with the lights and correct chroma.

Once the big form molding stage is complete I then start with smaller form modeling. In order for this stage to work the big form modeling needs to be correct. I have found with a lot of my students they like to rush through this step. The importance of getting that stage right is overlooked at more often than not. Smaller form modeling is just a miniature version of big form modeling. 

I am still not completely done with smaller form modeling since the background and leaves are not done. I lay in the background and really like how it pushes the peonies forward.

I keep going back and forth with the small form modeling stages through out the peonies and leaves. The painting is finally complete and really satisfied with it. These peonies get me excited for the summer after these sub zero temperatures we are experiencing. 

Thank you for stopping by and viewing, wishing everyone a Happy New Years!