Showing posts with label Yellow. Show all posts

Monday, March 26, 2012

"Mixed Tomatoes II"

Sold
"Mixed Tomatoes II"
8 x 10 in 
Oil on Canvas Panel
I wanted to continue the play on colors with these delicious tomatoes, I especially wanted to have an array of colors with an interesting composition.  The textures in their skin is extremely subtle along with their color shifts.  I felt for the most part I was painting mini balloons, never painted balloons before and now have an idea on how to do so.  With this painting I wanted to revisit big form modeling and implore that idea further.  I've stressed in previous posts about the importance of big form modeling and with this posting I'll do the same.  Playing with so many elements at once is challenging but delightful after seeing its completion from start to finish.
I started with the usual dry brush approach using no mediums and a bit of raw umber on the brush.  Once the drawing is complete I state the general colors of the tomatoes all at once, I do this to get unity out of the group of, this also lets me create a base to move my paint around and have that unity from beginning to end.  In this stage I am not concerned with big form modeling or details just the general flat color of the area.  The colors I use for this section are cad.red, cad.orange, cad.yellow medium hue.
After the general stage is complete I then start on big form modeling, this stage I start adding different colors that help turn the form with its light.  Still not worried about "details" or small form modeling just on how the form is turning away and into the light.  It's important to state that this stage is crucial in order to have a successful completion to your later stages.  I also stated the background in this stage to tackle the edges further.  Big form modeling is essentially laying down all the ground work for you, the smaller forms later or the "details" will lay in perfectly if the big form is done right.  With big form modeling I don't lay in the highest highlight or darkest value just a middle of the two to get the form turning.  Then on the next frame you can see that I laid in the smaller forms with the darker values and lighter values.  I like to break them up into two sections starting with darker then lighter values.  These sections work just right with the big form modeling, of course there is some areas that need fine tuning in order for the smaller form model to work right, but for the most part big form modeling lay's out the blueprint for each section you'r painting.
Once the tomatoes are complete I then start on the wooden base by approaching it the same way as I did with the wooden base.  First laying in the general colors and then doing the big form modeling or a fall light across the board.  Again not worried about the grainy textures in the wood just on the general light moving across the form.  This stage I am not applying the lightest or darkest values, I get close but stop since I add those details with the finishing touches.  Then on the next frame I state the smaller forms by first applying the darker values with their specific forms.  For this stage I used primarily burnt umber, raw umber titanium white, naples yellow and cerulean blue.
Once the darker forms are complete I state the lighter forms and take the wooden board to a finish.  I can see after adding the overall value of the base that the tomatoes started to look lighter in the darker areas, which is normal if you add a darker element next to it.  I went back into the tomatoes and darkened certain sections in order for them to work with the whole painting.  I hope you enjoyed this one and really had an understanding of my concept when I paint.  I appreciate you guys stopping by and viewing, till next time au revoir! 


Thursday, March 15, 2012

"Mixed Tomatoes"

Sold
"Mixed Tomatoes"
8 x 10 in
Oil on Canvas Panel
I'm finally back after such a long hiatus, I've been working on larger paintings and also ball point pen drawings.  I've decided to slow down a bit with these alla prima's and concentrate a bit more on my personal art work.  I felt as if these alla prima's started to become my identity as an artist and their sole purpose from the beginning is to just be practice paintings, in which they are.  I'm diving into larger more allegorical paintings, which means they do take longer to produce and I will not be devoting as much time to these alla prima's.  It's hard to not paint these little guys every day but I have to force myself in order to really produce a body of work that truly speaks as to who I am as an artist.  I plan to still produce one or two a week of these alla prima paintings after all I do love painting them and learn so much every time I finish one.  
On a side note I'll be teaching again this week coming up on the 22nd of March figure drawing at the Bloomington Art Center.  You can check out their site here and sign up for my class!

You can still sign up for my "Pink Roses" lesson!

Tuesday, February 7, 2012

"Lemon Plums"

"Lemon Plums"
6 x 6 in
Oil on Canvas Panel
These lemon plums caught my eye in the grocery store I could not get my eyes off of them.  They are unique looking to say the least and you know automatically I have to paint it.  I really like their colors and how orange their tips are.  Along with the colors I enjoy their textures, they are subtle but painting the smooth to rougher texture in one plane was a nice challenge.
I wanted to remind everyone that I am doing a painting demo this Thursday at Dick Blick in Edina, Minnesota from 10:45 to 2:00pm.  I hope to see you guys there! 
I started with the usual dry brush approach for the drawing stage.  Once the drawing is complete I stated the big form modeling with a very thin mixture on the brush, its a dry brush approach as well.  
I then just concentrate on the darker values with their specific forms.  Once thats completed I move onto the lighter forms and continue the same process.
I repeat the same process on the second lemon plum till its completed.    
Once the plums are complete I state the wooden base by applying a thin coat for the base.  Going back to the plums you can see that I start really thin with my mixture, this allows me to control my values from the brush touching the canvas.  Think of it as rendering with a pencil, once you put the pencil to the paper to get the subtle rendering you need to have a soft touch, same idea.  When I need the colors or values to be stronger and more opaque I'll go thicker with the paints, but I do so in a slow manner making sure the transitions are working within each other.  
Then I paint in the darker values with their specific forms and do the same with the lighter values.  
Once the wooden base is complete I start on the background, in this stage I make sure to take my time in polishing all the edges.  Thanks for stopping and viewing, hope you enjoyed!


Friday, January 27, 2012

"Red Apple"

"Red Apple"
6 x 6 in
Oil on Canvas Panel
This painting came up unexpected for me today, I was busy all day with meetings and running errands.  It was a pleasant surprise to get home and see if I can produce one very quickly.  I wanted to see if I can push my self to get details or smaller forms down in the painting with more clarity, I feel lately some of my paintings have gotten a bit blurry in that area.  In a sense its more of a therapeutic thing for me to do in order to feel right about the direction I'm going for.  After painting it I had the pleasure of eating this delicious apple, it's been a while since I've had apples almost forgot how good they are.  

Wednesday, January 25, 2012

"Assorted Apples"

"Assorted Apples"
8 x 10 in 
Oil on Canvas Panel
These apples I've been wanting to paint for a while in this arrangement, I've always been intrigued with the texture and subtle colors apples have.  Each of the apples have a subtle variation to its texture complimenting the rougher texture the wooden base has.  It's interesting applying the technique I did with the roses and rockwell study to this painting, of course it was't working right of the back but after a while it started coming together.  That's another thing I wanted to discuss on here about sticking it out till the end with you'r painting, no matter if its an alla prima or a longer still life painting.  In every painting that I do I always run into rough patches and think its not going to come out, but I keep going working hard until it finally does work.  Easier said than done but trust me if you push your self and not settle it will push you and your painting into that next level.  Thanks for stopping by hope you enjoyed!

Wednesday, January 18, 2012

"Lemon Peeled"

Sold
"Lemon Peeled"
6 x 6 in
Oil on Canvas Panel
This one was a very quick painting for me, I started later than I wanted to but I'm glad I was able to finish it.  I wanted to play around with lemons and how their peels wrap around the form.  I kept the inside of the lemon concealed to add more mystery to the peel.  I've been painting lemons for a while now and wanted a different approach for this one.  Thanks for stopping by!

Saturday, January 7, 2012

"Buddha's Hand Citron"

Sold
"Buddha's Hand Citron"
8 x 10 in
Oil on Canvas Panel
This is my first painting of 2012 and what a way to start the new year with a freaky looking one, you guys know me and painting weird looking fruits.  I was at the grocery store today and could not believe this was actually a fruit, I quickly picked the best one and hurried home to paint it.  It's so unique looking  seems as if its alive, amazing what mother nature can make just when you think you seen it all.  The textures on the citron were amazing to paint, love the smooth and rough textures it has.  Aside from painting it there was a piece of paper that came along with it when I bought it, gives information of where it comes from and how to cook it.  Interesting to know that they are only available from October to January, and mainly used for making jams and liqueurs.  
I wanted to also say thank you to everyone for your support last year in following my blog and commenting, I really do appreciate it.  I wish everyone the very best for 2012!  Here is the clip for my "Pink Roses" lesson thats available for purchase:
  
Thanks again everyone and Happy 2012!
I started with the usual dry brush approach using no mediums and a bit of raw umber on the brush.  Once the drawing is complete I stated the background first by using ultramarine blue, naples yellow and titanium white.  
After the background is laid in I state the general colors of the citron, I would do big form modeling to it but since the textures and tentacles are complicated I'll just slowly build my rendering through each stage instead of generalizing all at once.  The colors I used were viridian, cad.yellow pale hue, raw umber, and cad.orange.  Once the general colors are stated I went in and painted the darker smaller forms, the colors I used for this stage was primarily raw umber.
Then I laid in the lighter values with smaller form modeling and I just applied cad. yellow pale hue and titanium white.  When I stated the lighter values this allows me to go back into the darks and shift certain values to their right hue, I constantly jump back and forth till it looks right.  Once the citron is complete I move onto the wooden board by just using raw umber for the general color lay in.  
After the general color lay in I state the darker values by using ivory black, cad.orange, naphthol red and raw umber.  Then I complete the painting by adding the lighter values to the wooden board by adding titanium white, ultramarine blue, naphthol red and cad.orange.  When Adding the wooden board and the cast shadow from the citron I notice that the values within the fruit can go a bit darker, that's why sometimes its better to add the darkest values first to properly judge how dark you need to go with the subject your painting.  Hope you guys enjoyed this freaky looking fruit I know I definitely did and was scared at the same time ;)


Wednesday, October 26, 2011

"Pumpkin Stem"

Sold
"Pumpkin Stem"
7 x 5 in 
Oil on Canvas Panel
I've been so busy lately with teaching and doing larger paintings, at times I literally feel like a chicken with its head cut off.  But with so much going on I'm glad I'm able to push myself further and get more done of what I want to do with my regular body of work.  These little alla prima's I consider to be a practice for me, I try to refine my technique as best as I can and explore different avenues as well.  My regular paintings have benefited so much due to these alla prima's, I recommend anybody to do these small paintings daily if they can and see how much you can benefit from it.
The stem of this little guy was to good no to painting, it gives so much character to an object that doesn't move.  I like revisiting these pumpkins because of their textures, they are pretty challenging to render but that's what draws me to it.  I've also noticed that I have been painting my recent alla primas with an orange and yellow palette, seems like the holiday season has been influencing my colors more that I would like to admit.  Either way those colors are challenging to control and glad I'm able to practice so much with them.
I started with the usual dry brush approach using no mediums and a bit of raw umber.  I was asked recently what mediums I use towards the end of my painting since I don't use any in the beginning, and the answer is I don't use any through out the painting.  I find I can achieve more with the paint straight out of the tube, and if you notice there's already medium in the tube with the paint.  Now with my larger paintings I use linseed oil to lift up sunken areas and work back into them, but I keep it to a minimum.  I know a lot of people that swear by mediums and can't work without them, which is not a bad thing if you know how to control them and properly mix them.  The problem occurs when you use to much which can lead to yellowing of your painting and cracking through time.  Like I said before I don't mind people that use mediums I even use some of it with my larger paintings, but keep it to a minimal don't depend on it for everything.  
Once the drawing is complete I state the background and wooden base with its general colors and big form modeling.
After the big form modeling is complete I start on smaller form modeling and break it in two sections, the first is the darker values with their specific forms.  Once that's complete I state the lighter values with their specific forms and highlights.  The colors I used for the background were ultramarine blue, naples yellow and titanium white.  For the base I used the same colors I did for the background in the lighter areas, then I used raw umber, burnt sienna, ivory black and cad.orange.
Once the base is complete I start on the pumpkin by stating the general colors and big form modeling, I'm only worried on how the light wraps around the form and not about details.  Once that's complete I start on smaller for modeling again breaking in two sections, starting with the darker values with their specific forms.  The colors I used for the pumpkin were cad.orange, cad.yellow light, ivory black, raw umber and burnt sienna.  
Then I state the lighter values with their specific forms and highlights, doing this brings this area to a finish.  I start on the stem by just laying down viridian and ivory black, since its such a smaller area and the overall value is dark I can easily work into it afterwards.
I pick out the lights by using naples yellow, titanium white and ultramarine blue.  By doing this I take the painting to a finish!
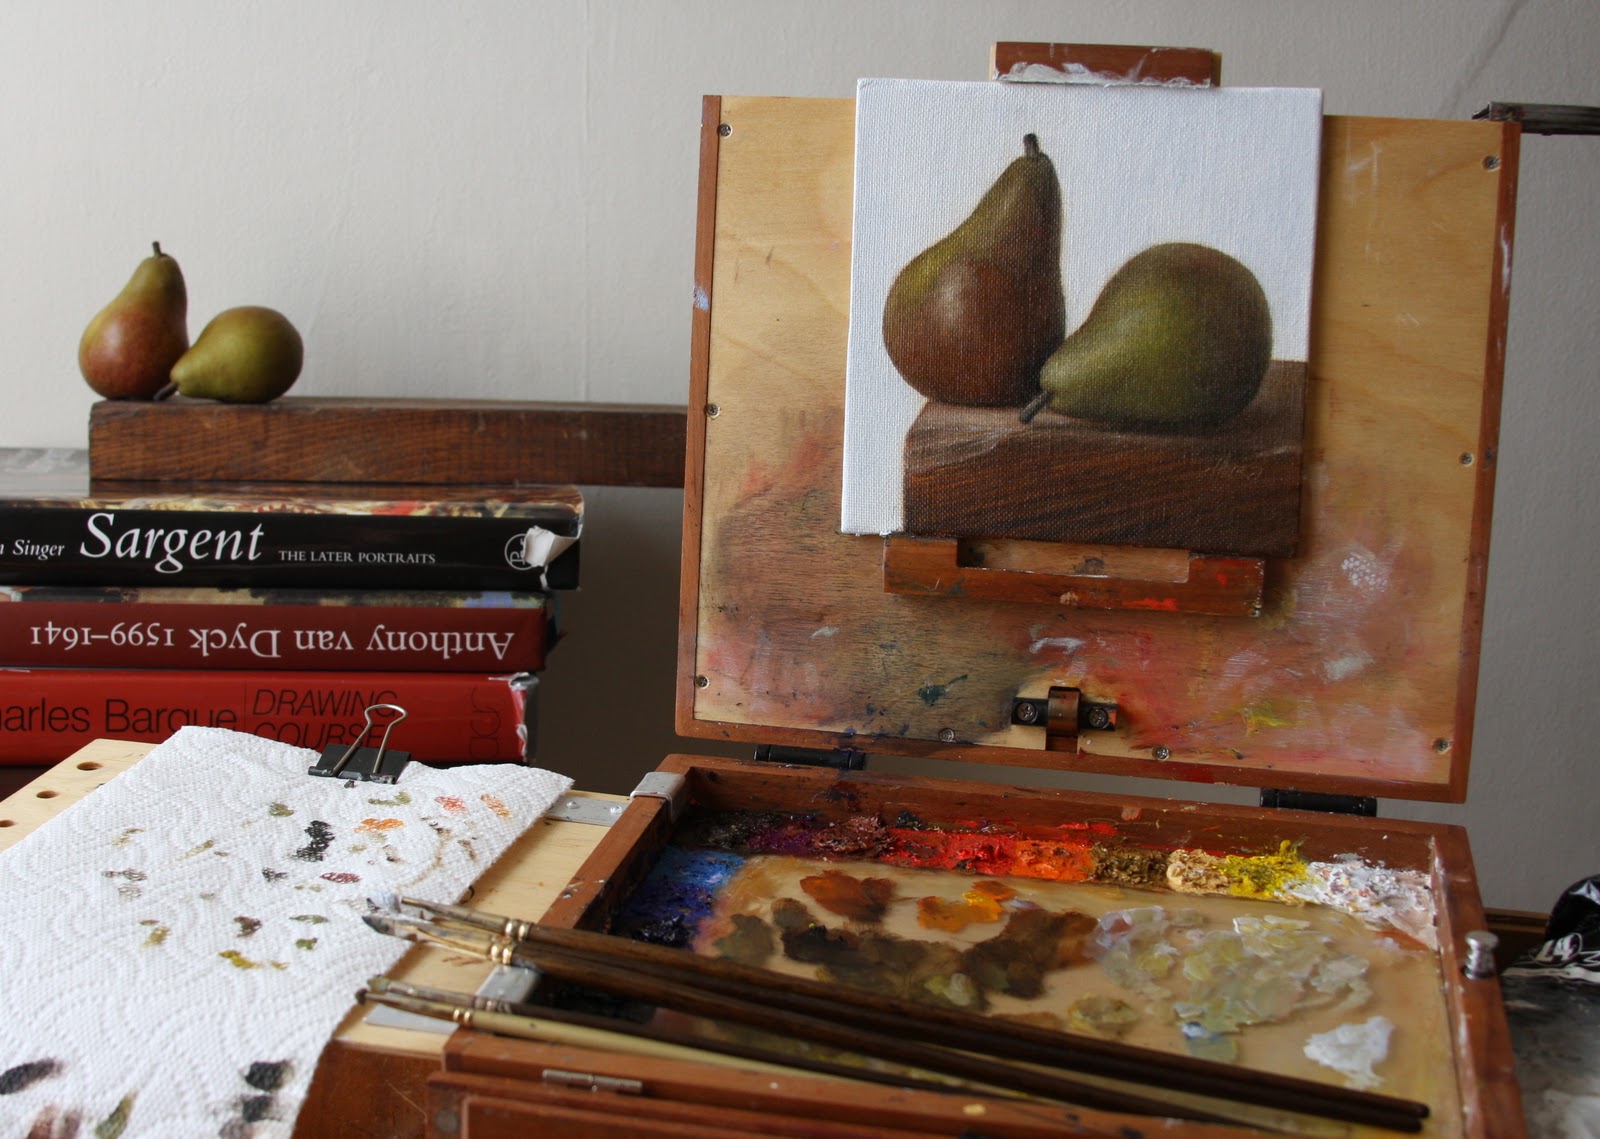
Picture of my setup with the finished painting.


Thursday, October 20, 2011

"Seckel Pears"

Sold
"Seckel Pears"
6 x 6 in
Oil on Canvas Panel
I saw these pears this morning at the grocery store and what really caught my attention is that they look like mini pears, they are literally half the size of regular pears.  Of course anything that seems out of the norm catches my attention and I have to paint it.  What also grabbed my attention with these guys are their textures, I wanted to examine them further with the paints.  I'm in this stage now that I want to push my handling in textures, I want to make the paint seem as its alive rather than over blended and dull.  That's the wondrous part of painting is that you can never be content, as for me I always try to push myself to get better and that's the beauty of these alla prima's.
Setup.
I started with the usual dry brush approach just using a bit of raw umber on the brush.  Then I stated the background and wooden base after the drawing is complete, I just concentrated on the fall of light and big form modeling with the general colors.  The colors I used in the background were ultramarine blue, naples yellow and titanium white.  The colors for the base were raw umber, burnt sienna, ivory black, ultramarine blue, and titanium white.
After the big form modeling is complete I started with the smaller form modeling, in this stage I like to break it up in two stages first starting with the darker values.  Then to finish the smaller form modeling stage I state the lighter values and their highlights.  
I start on the first pear after the wooden base is complete, again just stating the big form modeling stage with their general colors.  All I'm worried about in this stage is just turning the form with the light and general colors, not interested in details remember they are no use until the bigger form is working right.  With these pears since their overall values are darker handling the darker value stage is done when dealing with big form modeling, I only have to worry about the lighter values and highlights for the smaller form modeling.  The colors I used for the pears were viridian, ultramarine blue, naples yellow, raw umber, ivory black, cad.yellow light, burnt sienna and titanium white.
I repeat the same process with the second pear and take it to a finish.  
Another pic of the setup this time with the finished painting.  As you can see with my palette I don't use globs of paint in the beginning, I like to gradually build up to the thickness I'm going for.  I hope you enjoyed this one I know I certainly did, thanks for stopping by and viewing.


Tuesday, October 18, 2011

"HeirloomTomato"

Sold
"Heirloom Tomato"
6 x 6 in
Oil on Canvas Panel
It's good to be back in front of the easel after a long vacation, don't get me wrong I love vacationing but I don't like not being able to paint for that much of time.  I was at the grocery store today walking around seeing what can inspire me for todays alla prima, and I ran into a great looking heirloom tomato.  The shape of this heirloom is so unique, it resembles a balloon when it's being twisted.  One of the things I love painting the most is when the object does not look like what its suppose to be, its great trying to decipher it.  It feels great being back and painting hardcore again!
I wanted to share with you guys an article about me and the classes I'll be teaching at the Bloomington Art Center this winter, click here to view the article.  If you're interested in attending the classes just click here to find out more information.  I'll be teaching still life painting and figure drawing, should be a fun time overall I hope to see you guys there.
I started with the usual dry brush approach using no mediums and a bit of raw umber on the brush.  When the drawing is complete I stated the background and wooden base, I first started with the fall of light and big form modeling.  I only state the general colors going from dark to light and form the subject to fit the lighting thats given.  The colors I use were ultramarine blue, naples yellow and titanium white for the background.  For the base I used raw umber, red umber, ultramarine blue, naples yellow, titanium white.
Once the fall of light and big form modeling is working right I start adding the smaller form modeling, I start first with the darker values.  Once thats complete I state the lighter values and the highlights.
When the wooden base is complete I start on the heirloom tomato, I first concentrate on the big form modeling.  I'm not worried about details just the general colors and how the light wrapping around the form.  It has to look dimensional before adding any details to it.  Once the big form modeling is complete I start on the smaller form modeling, I first start with the darker values. 
Once the darker values are taken to a close finish I then state the lighter values and highlights.  The colors I used for the heirloom tomato were cad. orange, cad. yellow light, raw umber, ivory black, cad. red light, viridian, ultramarine blue, and titanium white.  I'm glad I painted this heirloom today it warmed me up with my process and really made me concentrate on big and small form modeling.  I hope you enjoyed this one, thanks for stopping by and viewing!


Thursday, September 29, 2011

"Fall Leaves"

Sold
"Fall Leaves"
10 x 8 in 
Oil on Canvas Panel
I got up this morning not knowing what I wanted to paint, I usually hang around the kitchen and see what inspires me.  My girlfriend and I just finish remodeling our kitchen which just consisted of putting in shelves, dish soap holder and a magnetic strip for the knives.  We love the way the kitchen looks and it has so much more space now for our little apartment.  While we were getting our kitchen ware from ikea we also picked up this adorable bottle, which inspired me this morning when first seeing it.  I was only going to paint the bottle but my girlfriend gave me a great idea to incorporate some of the leaves from outside.  Fall in Minnesota is so beautiful, the leaves on tree's change to these beautiful intense colors.  With her great idea that's what I did and really like the combination of the two.  Really different than what I usually do other than the wooden base but that's what attracted me to paint these objects, I really wanted to paint something different and push myself at the same time.  The bottle has so much subtle values and of course it's see through, clear glass is not something I usually paint and wanted to see how I can do it.  Alway's fun to see how far you can push yourself as a painter and stay true to what you'r painting.
I also wanted to let you guys know that starting this Saturday my paintings will be at the Dunn Bro's coffee shop, they're located on Humboldt Ave & Lake St. in Uptown, Minneapolis.  They'll be up for a whole month!
Picture of my setup after the drawing stage.  Today was an ideal day to paint with natural light it was cloudy which gives a nice soft light to the painting.  
I started with the usual raw umber on the brush for the drawing stage.  After the drawing is complete I stated the background and also painted the background color in the bottle since its see through.  I also painted the wooden base at the same time, the colors I used were yellow ochre, cobalt blue, titanium white, and raw umber.
Then I stated the darker values with their specific forms on the wooden base, the colors I used for this stage were ivory black and cad. orange.  I then added the lighter values with their specific forms, after doing that I filled in the general colors for the leaves.  The colors I used for the lighter values were titanium white, naples yellow, burnt sienna, and cobalt blue.  The colors I used for the general lay in of the leaves were cad. yellow light, naphthol red, raw umber, viridian, cobalt blue, and yellow ochre.
Then I stated the darker values with their specific forms for the first set of leaves on the left.  Then I added the lighter values with their specific forms by adding titanium white to the mixture.  I also start on the other set of leaves by stating their darker values and specific forms.
Then I take the leaves to a finish by adding the lighter values and their specific forms.  Once the leaves are completed I move onto the bottle by adding the middle to darker values with their specific forms.  I have to really concentrate and make sure to turn the form with the limited colors thats given.  The challenging thing about painting this bottle is it's edges, there's a lot of lost and found edges.  The colors I used for this stage were ivory black and titanium white.
For the finishing touches I add the lighter values and their specific forms, the colors I used for this stage is titanium white and cobalt blue.  I made sure to go thicker in the lights to really get that shine for the reflection.  I had fun with this one especially doing something completely different in subject matter, I learned a lot to say the least.  Hope you enjoyed this one, thanks for stopping by and viewing! 


Monday, September 26, 2011

"Yellow Pepper"

"Yellow Pepper"
6 x 6 in 
Oil on Canvas Panel
This is a small little pepper I found at the store yesterday and wanted to paint it.  I really like the transition of green to yellow, its tough trying to capture that change since it happens so fast.  Peppers can be challenging because of their smooth texture, a great challenge to painting.  It's always fun to challenge yourself even though you think you can paint it easily it can throw you in a whirl wind.
I started with the usual dry brush approach using no mediums and a bit of raw umber on the brush.  Once the drawing is complete I stated the background first using cobalt blue, naples yellow and titanium white.
Then I stated the general colors for the pepper and stem, the colors I used were cad.yellow light, viridian, and raw umber.  Then I state the darker values with their specific forms.
I do the same with the lighter values and take the pepper to a finish, I also state the darker values to the stem.
Then I stated the wooden board with its general colors.  I also took the stem to a finish by adding the lighter values with their specific forms.  I then added the darker values with their specific forms.  The colors I used for the wooden board were raw umber, ivory black, ultramarine blue, and cadmium orange.
Then I added the lighter values with their specific forms to the base and took the painting to a finish.  I hope you guys enjoyed this little quick painting, thanks for stopping by and viewing.