Friday, May 27, 2011

"Bagged Cherries"

Sold
"Bagged Cherries"
10 x 8 in
Oil on Canvas Panel
This painting was so much fun to do, its completely different than what I would do.  Painting a clear bag is something that seems to intimidating to paint, it's so complex in many ways.  I decided to just go at it with this painting and see what I can do and push myself out of my comfort zone.  Painting these cherries where so much fun, with this painting I was really able to show more of the beautiful colors these rainier cherries have.  I have to say that was the funnest part of the painting, painting so many cherries at once was a bit much to do but a lot of fun and glad I did so.  Not to say the other areas weren't fun, its just the cherries are in their own level.
I started with the usual dry brush approach using no mediums and just a bit of raw umber.  Then I started on the cherries all at once just stating the general colors, I'm not stating any of the darker and lighter tones yet.
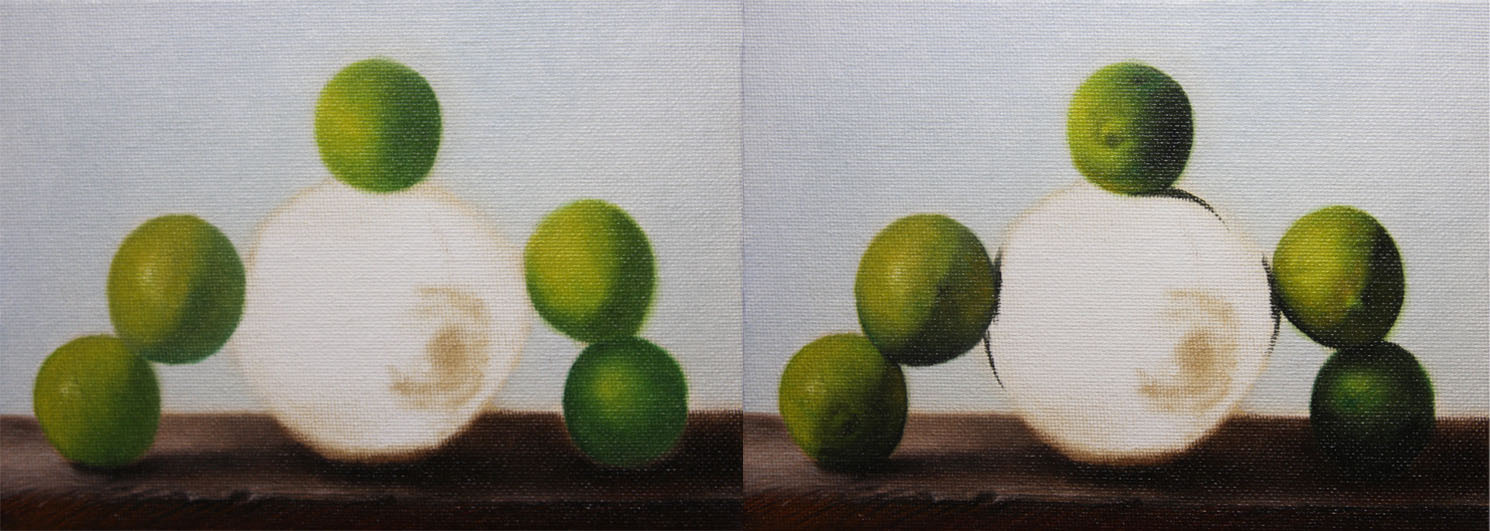
Then I start stating the middle to darker values not going to dark yet I wanna slowly get to the real darks, this way I'm able to control the values from light to dark.  The second picture shows that I stated the darker values and also added the stem to the cherries, I've also added the cast shadow to the base to have a point to work on when I start on it later.
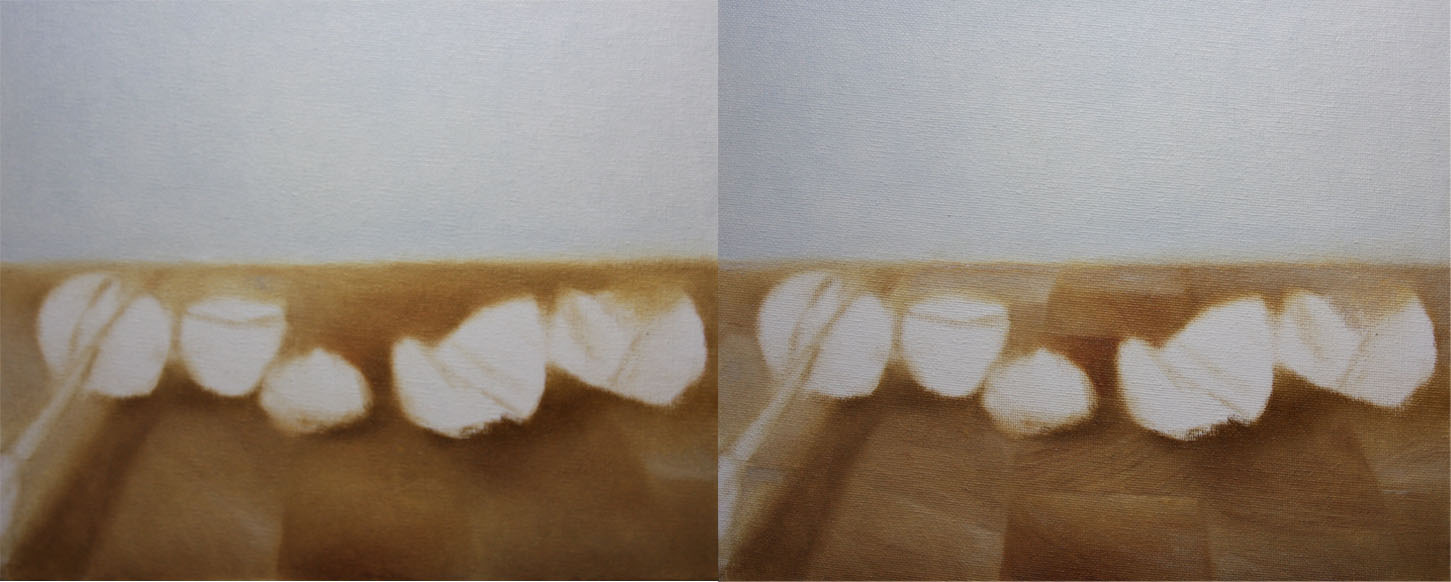
Then I state the lighter values and their specific forms, at this stage I'm able to take the cherries to a finish.  Then I start on the wooden base by adding the general colors and also the fall of light.
Then I add the darker values and their specific values, I do the same with the lighter values and take the cutting board to a finish.  After the cutting board is complete I then fill in the background, since I'm painting a see through bag I can just cover the whole background at this stage.
Then I start adding some of the middle values to give the impression of the bag, then I add highlights and the middle values.  Painting this bag was something I've never done before especially in one sitting, it was a challenge that I'm glad I did.  Painting a clear bag has so many obstacles to it but I found if you keep it simple then its not to complicated.  When painting the bag I made sure to soften the edges around the cherries to push some of them further away.  I had a lot of fun painting this one a bit different than what I usually do, great to get out of my comfort zone and see what I can do.  Thanks for stopping by and viewing, hope you enjoyed!  


Wednesday, May 25, 2011

"Saving Cherries"

Sold
"Saving Cherries"
5 x 7 in
Oil on Canvas Panel
I've been so busy lately with other paintings its good to step a way and pump one of these out through out the day.  Especially now since I know with the holiday coming up I won't have time to paint, which means i'll be twitching for a couple days feening to paint.  I was at the grocery store today and could not walk away from these cherries, I guess since spring is here and summer is around the corner they are just everywhere.  Here in Minneapolis spring is short lived because of our long winters sometimes we just jump straight into summer, but everyone once in a while spring pops up and its just beautiful outside.  Thats one of the things I really appreciate living up here is seeing the change of seasons and how beautiful it is, being born and raised in Miami, FL I only know one season summer.  Cherries are always a favorite of mine to paint, their deep reds and smooth surface always brings me back to them.  They are deceiving though they seem simple to paint but they have their challenges, the intense red and subtle value shifts make it tricky to paint.  A good challenge for someone if they want to learn how to paint smooth surfaces and subtle value and chroma shifts.  
I started with the usual dry brush approach using no mediums and just a bit of raw umber on the brush.  After the drawing is complete I start on all the cherries treating them at the same time in each stage, I first  lay in the general colors and try to do some big form modeling.
Then I add darker values and its specific forms and do the same with the lighter values.  In this stage i'm constantly going back and forth between values and adjusting it to the right look i'm going for, I take it to  a close finish and move onto the base.
With the base I start by laying general colors and the fall of light across the base, I'm not worried about details at this stage just getting the overall statement of colors and light.  Once that's working right I start by adding the darker values and its specific forms, I add the middle darker values as well and take both values to a finish.
Then I add the lighter values to the base and take the whole base to a finish.  Once the base is complete i'm able to concentrate on the background, I first start by treating the edges where the cherries meet the background.  I have to be careful in not contaminating my background color with the reds of the cherry, I also play with the softness of edges all around with the cherries and base.  After the background is complete I go back into the cherries and add some finishing touches here and there and take the whole painting to a finish.  That's one of the reasons I like to take the main object I'm painting to a close finish in the beginning, once all the other areas are painted the main object might look different in value and chroma.  Leaving room to adjust certain parts of the painting in the end is a good thing to do, never know if you do or don't need to do it better safe than sorry.  Hope you enjoyed this one, thanks for stopping by!

Saturday, May 21, 2011

Plein Air Painting

Contact me if interested in purchasing
"Lake of Isles"
4 x 6 in
Oil on Linen Panel
Today was raining for the most part and it cleared up around noon time, I went out with a buddy of mine for a quick plein air painting.  Here's a pic of our set up:
It was a lot of fun doing a landscape painting, completely different than what I usually do.  Landscapes are not my cup of tea for the most part but after today and just diving into this painting, I can say I changed my mind a bit about them.  Since the weather is getting better I plan to do more of these in the near future, thanks for stopping by and viewing. 


Friday, May 20, 2011

"Apricots & Vase"

Sold
"Apricots & Vase"
8 x 10 in
Oil on Canvas Panel
I wanted to continue using apricots in another painting since I think they are fun with their body shapes.  I decided to include a vase which was challenging to paint, to paint a glossy surface is fun and challenging as stated before.  What I liked about including the vase is the reflections it shows, it kind of shows you a background and tells more of a story.  It was neat incorporating this vase into the painting and hope to do more of these in the future.
I started with the usual dry brush approach for the drawing stage using minimal raw umber on the brush and no mediums.  After the drawing was complete I started stating the apricots all at once, I started with their general colors and also turning the form.  At this stage I'm not really interested in adding details just the generalization of colors and how light wraps around the form.  I also like to keep the paints fairly thin at this stage, remember putting a lot of paint in the beginning can make your colors look muddy when applying layers in the finishing stage.
After the big form modeling stage is done I start stating the darker values and its specific forms, the big form modeling stage to me is the most important stage to get right.  That stage sets the ground work for the details or smaller forms to work right later on, its easy to rush to the details in the beginning since thats what catches are eyes for the most part.  If you take your time and really understand the overall concept of form and values then details become much easier in the later stage.  After my darks are completed I then add the lighter values and its specific forms.  
I know I'm not done with the apricots but I've taken them to a stage where I'm comfortable to leave it for a while, I then start with the vase.  I use a thin application to cover the general values, when thats completed I start to add all the key notes in the vase.  I'm building up to my values with the vase I don't want to add an extreme value just yet, I like to make sure the surrounding tones are working right before giving it the finishing touches.
After the middle and darker values are working then I add the highlights and take the vase to a close finish.  Then I add the background to soften the edges of the apricots and vase, remember don't forget about your edges they are so important to the painting.  When adding the background I push the edges of the vase to lose some sections, its fun playing around with them and seeing how far you can push the edges.
When the edges are completed I move onto the wooden base, first I just concentrate on the general colors making sure the form is turning with the lights.  Then I start on the dark values and its specific forms.
Then I finish the base by adding the lighter values and its specific forms.  Then I went back to the apricots and finished them, it was difficult to finish them before stating the base since the surrounding values effect the values of the apricots.  I usually don't like doing this my approach is to finish each section as I go, but I guess sometimes its alright to get other areas finished and come back to it later.  I really like the finish look of this painting, as stated before the vase was a challenge and different than what I'm used to.  Its good to get out of your comfort zone and try new things at times, thanks for stopping by and hope you enjoyed.


Thursday, May 19, 2011

"Apricots"

Sold
"Apricots"
5 x 7 in
Oil on Canvas Panel
Apricots have a smooth surface to them, their tones are subtle and colors are deep but subtle as well.  I really like the shape of these guys they have a funny quirky shape to them, needless to say it was fun painting them.  Composing these guys wasn't to difficult no matter how you arrange them they always seem to say something by their body shape.  The smooth skin and rich colors made them even more delicious to paint, and to eat them was a plus after a long day of painting.
I started with the usual dry brush approach using no mediums and a bit of raw umber on the brush.  After the drawing is done I started laying the general colors, I'm keeping the paints fairly thin at this stage as I still have more paint to put on.
Then I start to get darker values to turn the form even more in the big form modeling stage, I progressively go into each level of tones.  I treat it as if I'm drawing with a pen or pencil, I slowly go from one tone to the other.  This creates better handling of the paints and more control.  At this stage I also don't add the darkest and lightest values, I like to keep the values in the middle stages.  I like to break down after big form modeling to darker and lighter value stage, meaning I add the darkest and lightest values and its details to take each area to a finish.  
After the darker values are stated I start on the lighter values and its specific values.  After finishing with the apricots I start on the wooden base by stating the general color and the way the lights are wrapping around the form.  Remember at this stage I'm not worried about details just a general statement of colors and the way the light falls on the form.  
Then I lay in the darker values and its specific forms, I do the same with the lighter values and take it to a finish.
I finish the painting by adding the background and softening the surrounding edges, its easy to forget about edges but remember they can make or break you'r painting.  It's important to not forget about them, sometimes I like to keep all the edges soft until the end of the painting and sharpen certain edges to give more of a focus to that area.  Thanks for stopping by I hope you enjoyed this one.


Saturday, May 14, 2011

"Dominique"

"Dominique"
16 x 20 in
Oil on Canvas Panel
I had attended a figure painting session at a friends studio, and we had the good fortune of having a great model.  Her name is Dominique and she was such a great model, she stood still the whole time and always had a grin on her face through out the pose.  She apologized in the end for laughing so much I told her that I thought it was great because we got to see more of her true side, from that we're able to portray that onto the painting.  This is only a three hour painting wish I had more time, but I do like the result of the session.  I hope to do more of these, I truly miss doing portrait and figure paintings.  

Friday, May 13, 2011

"King Lemon"

Sold
"King Lemon"
6 x 6 in
Oil on Canvas Panel
This is the third and last painting in the series of limes and lemon, it was fun cutting the limes up and arranging them around the lemon.  I believe the title fits this painting just right, especially the way the limes are surround the lemon.  I was also honing down my technique with this painting, getting more narrow in the way I render with the brush.  Concentrating more on the value relationships and how to model the form, its fun going back to the fundamentals and seeing how important they are.    
I started with the usual dry brush approach for the drawing stage, just using a bit of raw umber on the brush and no mediums.  After the drawing is complete I started on the limes instead of the background, reason I did that is because I've noticed I can control the edges better when I add the background later.  I stated the general colors in the first passage, not really adding any darker or lighter values just a general statement of colors pertaining to the limes.
Then I start working on big form modeling, at this stage I start to add darker values and work with the lights in turning the form.  Then I start to add the darker values and its specific forms and take that section to a finish, I do the same with the lighter forms.  As you can see I worked on all the limes at the same time, I feel it has more of unity look to it when I do that.
When the limes are completed to that point I start on the lemon, first stating the general colors using thin paint and then work on big form modeling.  Then I start on the darker values and its specific forms, I make sure I add all the colors that are in this value stage and take it to a close finish.  
I do the same with the lighter values and its specific forms, after stating the lighter forms I can see I have to shift some sections in the darker values.  Thats why I take the darker stage to a close finish so it gives me room to alter things if need be.  As you can see the big form modeling stage is very important to get right, it lays down the foundation where the details will be stated.  It has to work at that stage first before you start stating the smaller forms and its details.  After the lemon is complete I start to work on the wooden base by stating the general colors and it's big form modeling, I'm not worried about details at this stage just want to get a general feel of how the light falls onto the form and the general colors.  
Then I concentrate on the darker values and its specific forms, I do the same with the lighter values when complete with the darkest values.
Last but not least I state the background, and this is what I mean where I'm able to control the edges.  I'm able to go around each object that meets with the background and control the level of softness or sharpness I want it to be.  It's also fun leaving this stage till last, it's the quickest and really ties the painting together for that finish you'r looking for.  I hope you guys enjoyed this one, thanks for stopping by and viewing!


Tuesday, May 10, 2011

"Limes over Lemon"

"Limes over Lemon"
5 x 7 in
Oil on Canvas Panel
This was a neat composition to paint, it was difficult keeping the limes still long enough to be able to paint it.  This was a good balancing act in their part, I could only do so much.  I thoroughly enjoy painting these two subjects, with their subtle value shifts within their colors is neat to capture.  As stated before the composition was another great factor to paint, I like how it can tell many different stories just by its composition.  
I also wanted to wish all the mothers out there a Happy Belated Mother's Day! I was out of town and was unable to paint till today, it's always fun to take a break and spend it with friends and family.  After a  day or two I start fidgeting to paint again, can't go to long without it.
I started with the usual dry brush approach using no mediums and just a bit of raw umber on the brush.  When the drawing was complete I stated the background first and after filled in the wooden board, at this stage I'm only stating the general colors and not worried about details.
After the general colors are filled in the wooden board I stated the darker values and its specific forms.  I start narrowing down the details in this stage, I repeat the same process with the lighter values.
Then I move onto the limes after the wooden board is complete, I concentrate on big form modeling.  When I work at this stage I don't put any of the darkest or lightest values, all I worry about is stating the general middle values and also making the light turn with the form.  When thats complete I'm able to move onto the darker values and its specific forms.
When the darkest values are finished I move onto the lighter values and take the limes to a finish.  When thats complete I move onto the lemon and state the big form modeling.  When painting this stage in I make sure to keep my edges soft and not get to thick with the paints, I wanna have a nice base to work on and not have the paints get muddy.
Then I start adding the darker values and its specific forms, I also handle the subtle transitions in the middle value stage.  I'm constantly going back and forth and adjusting what needs to be softer or sharper in contrast.  I do the same when I state the lighter values and its specific forms, when doing this I take the painting to a finish.  Even when I painting the lighter values I'm still going back to my darks and adjust some areas to get the look i'm going for.  I hope you enjoyed this one it was fun painting it, thanks for stopping by and viewing!


Friday, May 6, 2011

"Balancing Act"

Sold
"Balancing Act"
7 x 5 in
Oil on Canvas Panel
This composition was fun to arrange, playing with the limes wrapping around the lemon was a joy especially having the one lime on top.  Its almost as if they're trying to take over the lemon and conquer it.  The colors are also a nice note to add, they are both close in chroma's and play off of each other pretty well.  The top lime was a challenge to keep still, its always fun to see how far you can push the limits of these guys.  Painting the lemon was a treat, creating textures and highlights is always beyond fun to do.
I got the drawing stage done with a bit of raw umber on the brush, once that was completed I stated the background and wooden base with just the general colors.  
Once the general colors are stated I went back into the wooden base and stated the darker values and its specific forms.  Then I stated the lighter values and its specific forms, I'm constantly going back and forth between values adjust them to the exact look i'm going for.
Then I move onto the limes just stating the general colors and stating the big form modeling, I'm not worried about details at this stage just the general information.  Then I apply the darker values and its specific forms.  I was asked in the last posting what colors I used for the limes, I use viridian, cad. yellow. and ultramarine blue.
Then I apply the lighter values and its specific forms or the details.  When I apply the specific forms of the darker and lighter values I'm applying the details, or you can also think of it as smaller form modeling.  Once the limes are complete I move onto the lemon just stating general colors and turning the form with the light.  At this stage I'm not stating the darkest and lighter values, just the middle values to get a base.
After the general colors are stated I apply the darker values and its specific values, and do the same with the lighter values.  The overall feel of the painting is exactly what I was going for, the composition as stated before is a plus and glad it worked out.  I hope you guys enjoyed this one it was fun making it, thanks for stopping by!


Wednesday, May 4, 2011

"Sliced Limes"

Sold
"Sliced Limes"
8 x 10 in
Oil on Canvas Panel
I wanted to create an interesting composition with some story mixed into it.  Limes are neat in shape their colors are pretty subtle too, its hard just to paint one in a frame you have to mix more into it.  I wanted to mix a whole bunch of them in one painting and create a story, it was fun playing around with this composition and then paint it.  The cutting board was another factor that played with this composition, its details and designs I believe works well with the overall painting.      
I started with just a dry brush approach using no mediums and just a bit of raw umber on the brush.  Once the drawing was complete I stated the background and the general colors of the wooden board.
Then with the wooden board I stated more of the general value shifts, at this stage I'm not worried about details just the general statement.  Then I added lighter values and its specific forms, I start to concentrate a bit more on details at this stage.
Then I add the general colors and big form modeling to the limes, I'm working on all the limes at once with each stage.  Then I added the darker values and its specific forms which insinuate more big form modeling. 
Then I add lighter values and highlights with its specific forms to take it to a finish.  As stated before I worked on all the limes at the same time with each value stage.  I hope you enjoyed this one, thanks for stopping by and viewing!